

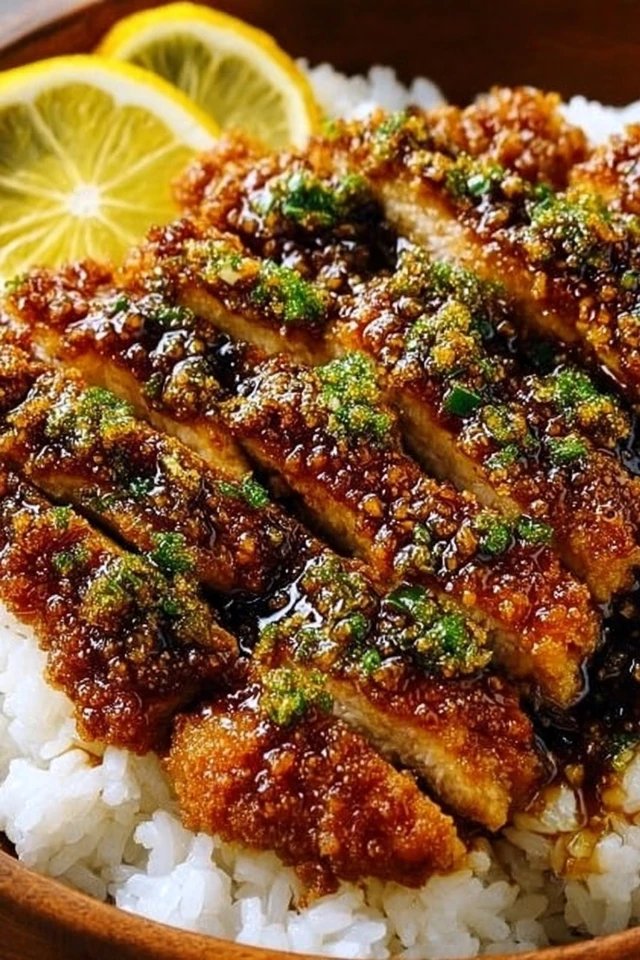
Lazy Honey Garlic Chicken is a simple, saucy dish with sweet and savory notes and a sticky, glossy finish that clings to tender baked chicken thighs. The honey gives a pleasant caramel touch, soy sauce adds depth and salt, and minced garlic and ground ginger build warm, aromatic flavor. Texture is soft and juicy inside with a lightly browned exterior after baking. This recipe is special because it asks for almost no hands-on time—mix the sauce, pour it over the chicken, and let the oven do the work. Serve it over rice, steamed vegetables, or a quick salad for a weeknight meal that feels like comfort food. If you want a faster version, compare techniques with this 20-minute honey garlic chicken bites.
Why You’ll Love This Lazy Honey Garlic Chicken
- Minimal prep: mix a quick sauce and pour it over the chicken—no marinating required.
- Strong flavor with little effort: honey and soy balance sweet and salty while garlic and ginger add warmth.
- Hands-off cooking: the oven does most of the work so you can prep sides or relax.
- Reliable results: bone-in thighs stay juicy and resist drying during baking.
- Flexible for meals: great for meal bowls, family dinners, or easy leftovers.
- Low cleanup: one baking dish for cooking and serving keeps dishes down.
- Garnish-ready: sesame seeds and green onions add crunch and color without extra cook time.
What Is Lazy Honey Garlic Chicken?
Lazy Honey Garlic Chicken is a straightforward baked chicken dish where bone-in chicken thighs cook in a simple honey-soy-garlic sauce. It tastes sweet, savory, and slightly tangy, with warm garlic and a hint of ginger. The sauce reduces slightly in the oven and coats the chicken with a sticky glaze that is both comforting and bright. The cooking method is oven-baked rather than pan-fried or grilled, which keeps the process low-effort and consistent. The vibe is weeknight comfort food—easy, satisfying, and family-friendly—yet elegant enough for casual dinner guests.
Ingredients for Lazy Honey Garlic Chicken
For the Base
- 4 pieces chicken thighs
For the Sauce
- 1/4 cup honey
- 1/4 cup soy sauce
- 4 cloves garlic, minced
- 1 tablespoon olive oil
- 1 teaspoon ground ginger
- 1/2 teaspoon black pepper
To Serve
- 1 tablespoon sesame seeds (optional)
- 2 green onions, chopped (for garnish)
Ingredient Notes (Substitutions, Healthy Swaps)
- Honey: Use maple syrup or agave if you need a vegan swap, but flavor will shift slightly sweeter and less floral.
- Soy sauce: Low-sodium soy sauce works to cut salt. For gluten-free, use tamari or a gluten-free soy substitute.
- Garlic: Fresh minced garlic gives the best aroma. If you only have garlic powder, use about 1/2 teaspoon as a last resort.
- Olive oil: Any neutral oil (canola, vegetable) will work; sesame oil can add a toastier note but use sparingly so it doesn’t overpower.
- Ground ginger: Fresh grated ginger can be used—use about 1 teaspoon fresh for every 1/4 teaspoon ground, but keep the amount mild so it stays balanced.
- Chicken thighs: Bone-in thighs are recommended for juiciness. You can use boneless thighs with slightly shorter bake time; reduce to 20–25 minutes and check doneness.
- Sesame seeds and green onions: Optional but they add texture and bright flavor. Toast sesame seeds lightly for extra aroma.
Step-by-Step Instructions
Step 1 – Preheat and prepare the pan
Preheat your oven to 400°F (200°C). Use a medium baking dish that fits the 4 chicken thighs in a single layer so they cook evenly.
Visual cue: The oven should be hot and ready when the chicken goes in to encourage browning.
Step 2 – Make the honey garlic sauce
In a bowl, mix 1/4 cup honey, 1/4 cup soy sauce, 4 cloves minced garlic, 1 tablespoon olive oil, 1 teaspoon ground ginger, and 1/2 teaspoon black pepper until combined. Ensure the honey dissolves into the soy so the sauce is even.
Step 3 – Arrange chicken and pour sauce
Place the 4 pieces of chicken thighs in the baking dish, skin side up if skin-on, and pour the honey garlic sauce over them, turning each thigh slightly so sauce contacts the meat and skin.
Step 4 – Bake
Bake in the oven for about 25–30 minutes or until the chicken is cooked through. Halfway through, spoon some sauce over the thighs to keep them glossy and encourage even coating.
Step 5 – Finish and garnish
When done, remove the dish and let the thighs rest 3–5 minutes. Sprinkle with 1 tablespoon sesame seeds (optional) and chop and scatter 2 green onions over the top before serving.
Pro cue: Target an internal temperature of 165°F (74°C) at the thickest part of the thigh for safe and juicy meat.
Pro Tips for Success
- Pat the chicken dry before adding sauce to help skin brown and avoid steaming.
- Distribute thighs in a single layer so air circulates and sauce reduces evenly.
- If you want a thicker glaze, bake for the full 30 minutes and then broil 1–2 minutes while watching closely to caramelize the sauce.
- Use a thermometer to avoid overcooking; thighs remain juicy at 165°F (74°C).
- If the sauce is too salty, add a teaspoon of honey or a splash of water to balance before baking.
- Let the baked thighs rest for a few minutes so juices settle and the glaze sets.
- For crispier skin, broil at the end for a minute, but keep an eye on sugar in the honey to prevent burning.
Flavor Variations
- Optional citrus kick: Add 1 teaspoon lemon zest to the sauce for bright notes without changing method.
- Optional heat: Stir in 1/4–1/2 teaspoon red pepper flakes or a small drizzle of chili oil for a spicy version.
- Optional hoisin twist: Replace 1 tablespoon of soy sauce with 1 tablespoon hoisin for a deeper, sweeter flavor.
- Optional herb lift: Sprinkle chopped cilantro or parsley before serving for a fresh finish.
- Optional sesame boost: Add 1 teaspoon toasted sesame oil to the sauce for a toasted, nutty layer.
- Optional garlic-forward: Increase to 6 cloves garlic if you prefer stronger garlic flavor; the texture and cook time stay the same.
Serving Suggestions
- Serve over steamed white rice, jasmine rice, or brown rice to soak the sauce.
- Plate with sautéed green beans, broccoli, or roasted Brussels sprouts for a balanced meal.
- Make a bowl: rice, shredded carrots, sliced cucumber, and a thigh on top with extra sauce.
- Use as a protein for wraps or soft tacos with shredded lettuce and sliced green onions.
- Offer pickled vegetables or a simple cucumber salad to cut the sauce’s sweetness.
- For a casual dinner, serve with mashed potatoes to mop up every bit of the glaze.
- Garnish with extra sesame seeds and green onions for better texture and color on the plate.
Make-Ahead, Storage & Reheating
- Make-ahead: Prepare the sauce up to 24 hours and store it in a sealed container in the fridge. Keep chicken ready in the baking dish covered and pour the sauce over just before baking.
- Fridge storage: Cool leftovers, then store in an airtight container for up to 3–4 days.
- Reheating best practice: Reheat gently in a 325°F oven for 10–15 minutes until warmed through, or microwave in short bursts and cover to keep moisture. Spoon extra reserved sauce or a splash of water over pieces before reheating to restore shine.
- Texture changes: After refrigeration, the sauce will thicken and set. A gentle reheat brings back a glossy finish but skin won’t be as crisp as fresh-baked.
Storage and Freezing Instructions
- Freezing cooked chicken: Place cooled thighs in a freezer-safe container or heavy-duty bag, remove as much air as possible, and freeze up to 2 months. Thaw in the fridge overnight before reheating.
- Freezing raw in sauce: You can freeze raw thighs in the sauce in a sealed container for up to 2 months; thaw completely in the fridge before baking and check internal temperature while cooking.
- If you prefer not to freeze: Keep raw thighs and sauce separate in the fridge for up to 24 hours and bake fresh for best texture.
- Note on texture: Freezing and reheating can change skin crispness and sauce viscosity. Reheat in the oven to regain the best texture rather than microwaving only.
Nutrition Facts (Per Serving)
Calories | Protein | Carbs | Fat | Fiber | Sodium
—|—:|—:|—:|—:|—:
Approx. 420 | 28 g | 22 g | 22 g | 0.5 g | 780 mg
Estimates vary by brands and portions.
FAQ About Lazy Honey Garlic Chicken
Q: Why is my sauce too thin after baking?
A: The oven heats and can thin a sauce if the baking dish is deep. Spoon sauce onto the chicken during baking and broil 1–2 minutes at the end to reduce and thicken.
Q: Can I use boneless chicken thighs?
A: Yes. Boneless thighs cook faster—check at 20 minutes and aim for 165°F internal temperature.
Q: How do I stop the sauce from burning?
A: Watch during broil steps. Honey browns quickly, so broil for just 1–2 minutes. If the sauce darkens too fast, lower the oven and cover loosely with foil.
Q: Can I reduce the sodium?
A: Use low-sodium soy sauce or reduce the soy to 3 tablespoons and balance with a touch more honey.
Q: The chicken looks pale—how to get color?
A: Pat the skin dry and bake uncovered at 400°F. For extra color, broil briefly at the end while watching closely.
Q: Is this safe for meal prep?
A: Yes. Store cooled chicken in airtight containers and use within 3–4 days. Reheat thoroughly to 165°F.
Notes
- Use a light-colored baking dish to better judge browning; dark pans can over-brown sugar in sauces.
- If you prefer less sauce, reserve half before pouring; use it as a dip or to reheat with leftovers.
- Toast sesame seeds in a dry pan for 1–2 minutes before garnishing to deepen flavor.
- Trim excess fat from thighs if you want a leaner final dish, but avoid removing too much or meat can dry.
- Slice green onions diagonal for a nicer look and wider green pieces for a pop of color.
Troubleshooting
- Bland flavor: Increase garlic slightly or add a pinch more black pepper and a teaspoon more soy sauce or honey to balance.
- Overcooked dry chicken: Reduce oven time or check earlier; boneless thighs finish faster than bone-in.
- Sauce too salty: Add a teaspoon or two of honey or a squeeze of lemon to balance saltiness.
- Burning at edges: Use a foil tent or lower the oven 25°F and extend bake time a few minutes.
- Sauce separation: Stir sauce before pouring to re-emulsify or spoon thickened glaze over thighs after baking.
- Undercooked thighs: Always use a meat thermometer; return to oven if under 165°F and bake an additional 5–8 minutes.
Final Thoughts
This Lazy Honey Garlic Chicken is a dependable, low-effort dish that delivers sweet and savory comfort with a sticky glaze and tender meat. It works for busy weeknights, simple meal prep, or a cozy dinner when you want big flavor with little fuss.
Conclusion
For more ideas and variations on honey garlic chicken that follow a similar, easy method, see this helpful recipe: Honey Garlic Chicken – Craving Home Cooked
Lazy Honey Garlic Chicken
Ingredients
For the Chicken
- 4 pieces chicken thighs Bone-in thighs recommended for juiciness.
For the Sauce
- 1/4 cup honey Use maple syrup or agave for a vegan swap.
- 1/4 cup soy sauce Low-sodium or gluten-free soy sauce can be used.
- 4 cloves garlic, minced Fresh minced garlic recommended.
- 1 tablespoon olive oil Any neutral oil can be substituted.
- 1 teaspoon ground ginger Fresh grated ginger can also be used.
- 1/2 teaspoon black pepper
To Serve (Optional)
- 1 tablespoon sesame seeds Optional, for garnish.
- 2 pieces green onions, chopped For garnish.
Instructions
Preparation
- Preheat your oven to 400°F (200°C) and prepare a medium baking dish suitable for the chicken.
- In a bowl, mix together honey, soy sauce, minced garlic, olive oil, ground ginger, and black pepper until combined.
- Place the chicken thighs in the baking dish and pour the sauce over them, ensuring the sauce contacts the chicken.
Cooking
- Bake the chicken in the preheated oven for 25-30 minutes, spooning sauce over thighs halfway through.
- Remove the dish and let the chicken rest for 3-5 minutes before garnishing.
- Sprinkle with sesame seeds and chopped green onions before serving.