
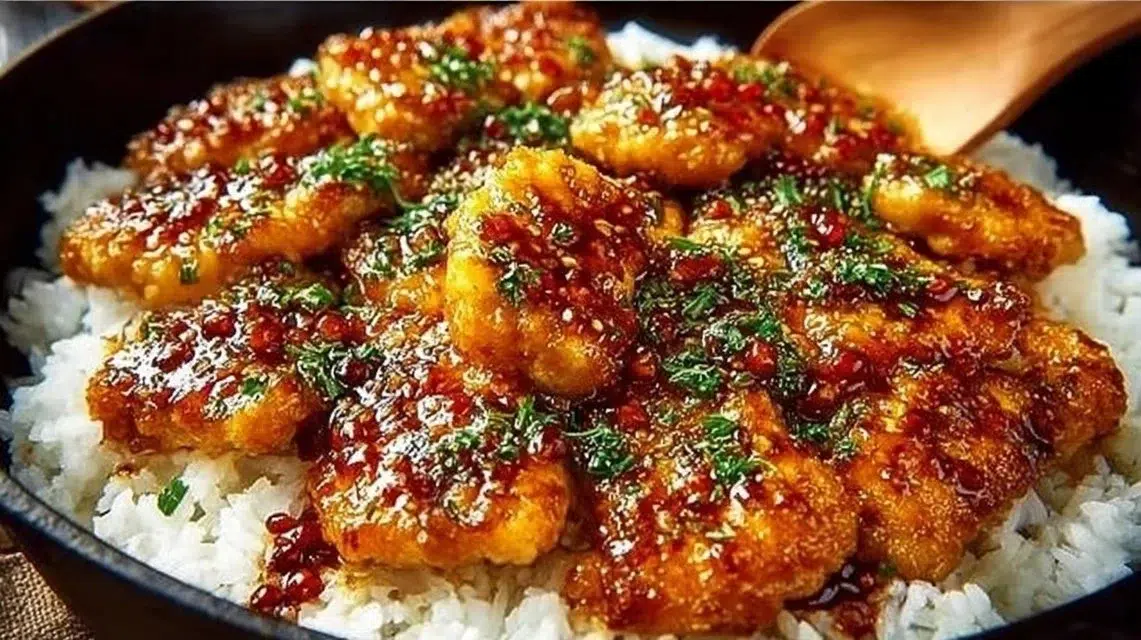
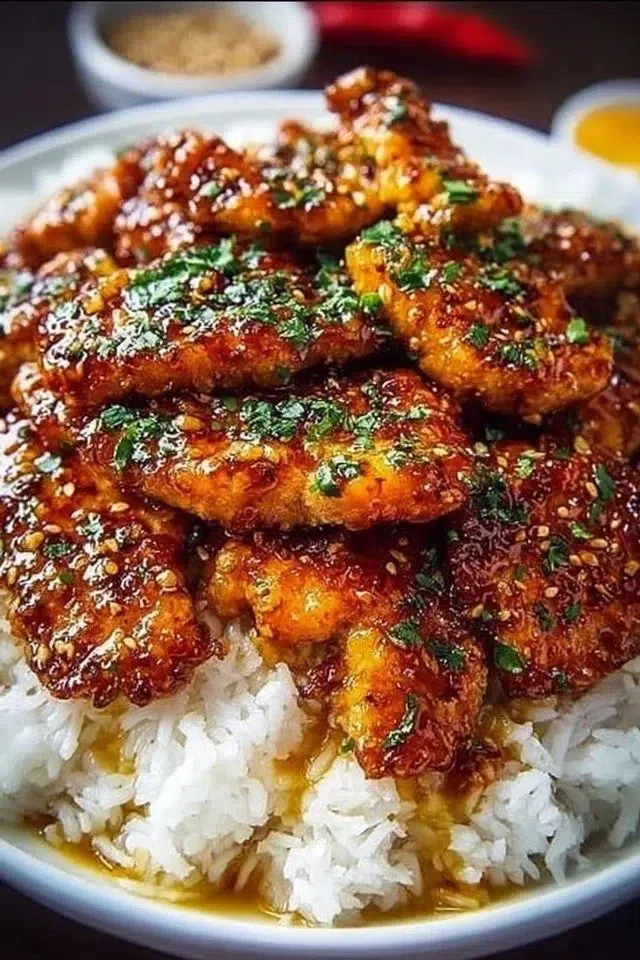
Sweet & Savory Honey Garlic Chicken is a sticky, glossy pan-fried dish with a bright honeyed sweetness balanced by savory soy and a mild tang from rice vinegar. Each bite gives tender chicken pieces coated in a shiny glaze and a soft garlic hit that stays on the palate. This recipe is fast, uses simple pantry staples, and cooks in one skillet, so it’s perfect for busy weeknights or a casual dinner with friends. Serve it over steamed rice for a complete plate, or tuck it into a wrap for a quick lunch. For the full source and photos, visit the recipe page.
Why You’ll Love This Sweet & Savory Honey Garlic Chicken
- Fast skillet method — ready in about 30 minutes with simple steps.
- Sticky, glossy glaze that clings to every bite for great texture.
- Balanced sweet and savory flavor with a touch of bright vinegar.
- Uses easy pantry items: honey, soy, cornstarch, garlic.
- Flexible: works with rice, noodles, or a leafy green bed.
- Great for meal prep — heats up well and stays saucy.
- Mild heat option with chilli flakes, which you can skip for kids.
- Little hands-on time once the sauce is whisked and chicken is seared.
What Is Sweet & Savory Honey Garlic Chicken?
This is a pan-cooked chicken dish where small, bite-sized pieces are seared until golden, then tossed in a quick honey garlic sauce that thickens into a glossy glaze. The sauce blends honey’s natural sweetness with garlic’s savory depth, light soy sauce for salt and umami, and rice vinegar for a clean, sharp lift. The texture is a contrast between crisped edges and tender centers, all coated in a sticky, spoonable sauce. It’s comfort food with a fast, weeknight vibe — easy enough for a simple dinner but tasty enough for company.
Ingredients for Sweet & Savory Honey Garlic Chicken
For the Base
- 8 boneless, skinless chicken thighs, cut into 1-inch pieces
- ½ tsp salt
- ¼ tsp black pepper
- 2 tbsp vegetable oil, plus more for searing
- 1 tbsp unsalted butter
For the Sauce
- 4 cloves garlic, minced
- 110g (1/3 cup) honey
- 80ml (1/3 cup) chicken stock
- 1 tbsp rice vinegar
- 1 tbsp light soy sauce
- ½ tsp chilli flakes (optional)
- 2 tbsp cornstarch
- 4 tbsp cold water (for slurry)
To Finish & Serve
- 1 tbsp finely chopped fresh parsley
- Cooked rice, for serving
Ingredient Notes (Substitutions, Healthy Swaps)
- Honey: Swap with maple syrup in a 1:1 ratio for a slightly earthier flavor. Use less for a less sweet glaze.
- Chicken: Boneless, skinless thighs give the best mix of flavor and tenderness. You can use boneless chicken breasts; cut into 1-inch pieces and watch the cooking time to avoid drying.
- Light soy sauce: For low-sodium, use low-sodium soy and reduce added salt by half. Tamari works as a gluten-free option.
- Cornstarch slurry: Arrowroot is a one-to-one swap if you prefer. Note arrowroot thickens best at lower heat and stays clear.
- Oil and butter: Use only oil for a dairy-free version, or use a plant-based butter substitute if needed.
- Stock: Water may be used in a pinch, but stock adds savory depth. A low-sodium stock keeps control of salt.
- Chili flakes: Optional — add up to 1 tsp for real heat, or omit for kids.
Step-by-Step Instructions
Keep the steps clear and work in batches so the chicken browns well.
Step 1 – Prepare the chicken
Pat chicken pieces dry with paper towels. In a medium bowl, drizzle the chicken with 2 tbsp vegetable oil, then sprinkle with ½ tsp salt and ¼ tsp black pepper. Toss to coat evenly. Set aside.
Visual cue: The pieces should look lightly glossy from the oil and evenly seasoned.
Step 2 – Craft the honey garlic sauce
In a liquid measuring cup or bowl, combine minced garlic, 110g (1/3 cup) honey, 80ml (1/3 cup) chicken stock, 1 tbsp rice vinegar, 1 tbsp light soy sauce, and optional ½ tsp chilli flakes. Whisk until well combined. In a separate small bowl, whisk 2 tbsp cornstarch with 4 tbsp cold water until smooth to form a slurry. Set aside.
Step 3 – Sear the chicken
Heat a large skillet over medium-high heat with additional vegetable oil and 1 tbsp unsalted butter. Add chicken in a single layer, working in batches so you don’t crowd the pan. Sear each batch for 3–4 minutes per side, until deep golden-brown and cooked through to 165°F (74°C). Transfer cooked chicken to a clean plate and set aside.
Pro cue: Don’t flip too often — let a good crust form. If steam rises instead of sizzle, the pan is too crowded.
Step 4 – Glaze and finish
Reduce heat to medium-low. Pour the prepared honey garlic sauce into the skillet and bring it to a gentle simmer while stirring continuously. Re-whisk the cornstarch slurry, then slowly pour it into the simmering sauce in a thin stream, stirring constantly until the sauce thickens into a glossy glaze that coats the back of a spoon. Return all cooked chicken pieces to the skillet, tossing gently but thoroughly to coat every piece in the sticky glaze. Simmer for 1–2 minutes to meld flavors.
Step 5 – Serve
Transfer Honey Garlic Chicken to a serving platter or individual bowls. Garnish generously with finely chopped fresh parsley. Serve immediately over cooked rice.
Visual cue: The sauce should be thick and shiny, not runny. The chicken pieces should be evenly coated and glossy.
Pro Tips for Success
- Dry the chicken well before seasoning to help it brown faster and more evenly.
- Use a heavy skillet (cast iron or stainless) for better sear and heat retention.
- Work in batches — overcrowding drops the pan temperature and causes steaming.
- Re-whisk the slurry just before adding it to avoid lumps. Add it slowly while stirring.
- Keep the heat moderate when thickening the sauce — high heat can break down the honey and make it thin.
- Taste, then adjust: add a splash more rice vinegar or a pinch of salt if the sauce needs more balance.
- If the sauce becomes too thick once cooled, add a splash of stock or water and reheat gently.
Flavor Variations
All optional — keep the base sauce and change small parts to create a twist.
- Spicy Honey Garlic (optional): Add ½–1 tsp cayenne or increase chilli flakes to 1 tsp.
- Sesame Honey Garlic (optional): Stir in 1 tsp toasted sesame oil and sprinkle toasted sesame seeds before serving.
- Orange Honey Garlic (optional): Add 1 tsp orange zest and 1 tbsp orange juice to the sauce for a citrus lift.
- Ginger-Garlic (optional): Add 1 tbsp grated fresh ginger with the garlic for warm spice.
- Sticky Teriyaki Twist (optional): Add 1 tbsp mirin or 1 tsp brown sugar to deepen the flavor.
- Veggie Boost (optional): Stir in quick-sautéed broccoli or snap peas in the last 1–2 minutes to add color and crunch.
Serving Suggestions
- Classic: Serve over steamed white or brown rice with the sauce spooned over.
- Veg-forward: Place over a bed of wilted bok choy or sautéed greens.
- Noodle bowl: Toss with cooked udon or soba and top with scallions.
- Lettuce cups: Spoon into romaine or butter lettuce leaves for a low-carb hand-held option.
- Family style: Plate on a large platter with rice on the side and let everyone help themselves.
- Weeknight meal: Add a simple cucumber salad or quick pickled carrots for contrast.
Make-Ahead, Storage & Reheating
- Make-ahead: Cut and season the chicken up to a day ahead and store covered in the fridge. Make the sauce components (not the slurry) and keep chilled.
- Cooked storage: Store cooked chicken and sauce in an airtight container in the fridge for 3–4 days.
- Reheating: Reheat gently on the stove over low-medium heat, stirring often. Add a splash of stock or water if the sauce has thickened too much. Avoid high heat which can dry the chicken or scorch the honey. Microwave in short bursts, stirring between intervals for even heat.
- Texture note: The glaze will set and firm in the fridge. Reheat slowly to return it to a glossy, sticky state.
Storage and Freezing Instructions
- Freezing: You can freeze cooked chicken and sauce for up to 2 months. Cool completely, place in a freezer-safe container or bag, and remove as much air as possible.
- Thawing: Thaw in the fridge overnight before reheating. Reheat gently on the stove with a splash of stock to revive the sauce.
- If freezing is not ideal: If you prefer fresher texture, freeze raw seasoned chicken (uncooked) and cook from frozen or thaw and sear then add fresh sauce when ready. This keeps the texture closer to fresh-cooked.
Nutrition Facts (Per Serving)
Calories | Protein | Carbs | Fat | Fiber | Sodium
— | —: | —: | —: | —: | —:
~606 kcal | ~52 g | ~32 g | ~30 g | ~1 g | ~740 mg
Estimates vary by brands and portions.
FAQ About Sweet & Savory Honey Garlic Chicken
Q: My sauce is too thin — how do I fix it?
A: Bring the sauce to a gentle simmer and add a little more cornstarch slurry (mix 1 tsp cornstarch with 1 tbsp cold water). Stir while it simmers until it thickens.
Q: The sauce is too thick — can I thin it?
A: Yes. Stir in small amounts of chicken stock or warm water until you reach the texture you want.
Q: How do I know chicken is done without a thermometer?
A: Cut a larger piece in the thickest part. The meat should be white through with clear juices. No pink should remain. Using a thermometer is best: 165°F (74°C).
Q: Can I make this gluten-free?
A: Yes. Use tamari or a gluten-free soy sauce instead of light soy sauce, and ensure your stock is gluten-free.
Q: Can I use chicken breast instead?
A: Yes, but cook shorter and watch closely. Breast meat can dry out; 1-inch pieces sear faster than thighs.
Q: Why did my cornstarch slurry clump?
A: Cornstarch clumps when added to hot liquid or if it sits too long. Always mix the slurry until smooth and add it slowly while stirring.
Notes
- Serve straight from the skillet for a rustic look and to keep the sauce hot.
- Garnish with chopped parsley and a few extra chilli flakes if you like a color pop.
- Use a wide skillet so you can sear chicken in a single layer for even browning.
- If you want extra shine, finish with a tiny knob of butter stirred in off the heat.
- For a cleaner plate, spoon excess sauce over rice rather than pooling on the platter.
Troubleshooting
Problem: Chicken is bland. Fix: Taste the sauce before adding chicken back. Add a pinch more salt or a splash of soy or rice vinegar to increase depth.
Problem: Sauce burned in the pan. Fix: Immediately remove pan from heat, transfer sauce to a new pan, and clean the original. Cook on lower heat moving forward.
Problem: Chicken is dry. Fix: Use thighs next time or reduce sear time. Add sauce back and simmer gently to add moisture.
Problem: Sauce is dull and not glossy. Fix: Simmer the sauce slightly longer to concentrate flavors; finish with a small pat of butter to add shine.
Problem: Too salty. Fix: Balance with a touch more honey, a squeeze of lemon or more rice vinegar, or add a mild starch like extra rice to absorb salt.
Problem: Lumps in sauce. Fix: Strain sauce if needed, or reheat and whisk firmly while adding a small extra slurry.
Final Thoughts
This Sweet & Savory Honey Garlic Chicken is a fast, forgiving dish that tastes far richer than it is to make. The sticky glaze, simple prep, and flexible serving ideas make it a go-to for weeknights and small gatherings. Once you master the balance of sweet, savory, and acid, you’ll find it easy to tailor to your taste.
Conclusion
For a closely related version with step-by-step photos, visit Honey Garlic Chicken (Sweet And Savory!) – The Anthony Kitchen.