
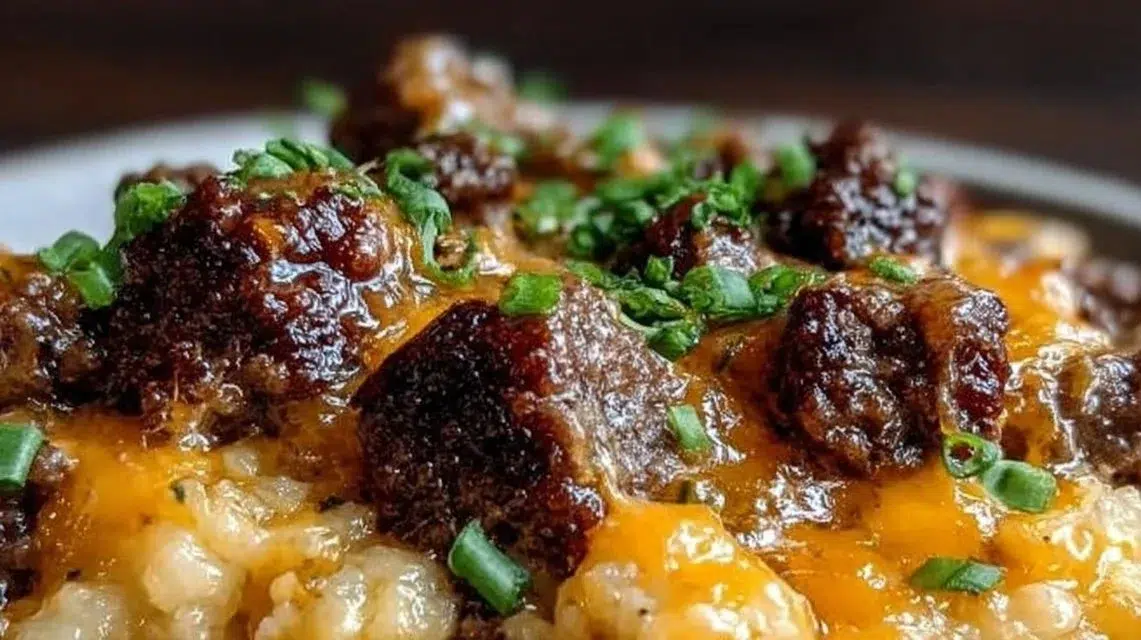
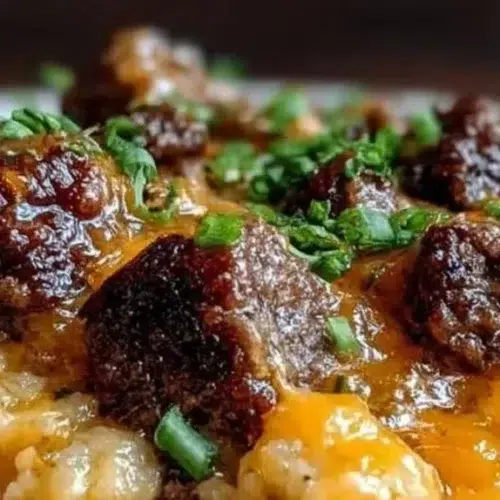
This Cheesy Beef Bowl is a warm, comforting dish built on savory browned beef, tender cooked rice, and a blanket of melted cheddar that pulls into gooey ribbons with every forkful. The taste is rich and beef-forward with buttery garlic notes, while the texture balances juicy crumbled beef and fluffy rice under bright, melty cheese. It’s a simple one-skillet meal that comes together fast, so it’s perfect for busy weeknights or a relaxed weekend lunch. You can serve it straight from the skillet or spoon it into bowls and add a quick salad on the side. If you like hearty, cheesy dinners, you might also enjoy a similar family-friendly bake like the Beefy Tortellini Bake recipe.
Why You’ll Love This Cheesy Beef Bowl
- Ready in about 20 minutes from start to finish — great for busy nights.
- Simple ingredients you likely already have in your kitchen.
- Big, satisfying flavor from browned ground beef and sharp cheddar.
- Soft, fluffy rice soaks up beef juices for great texture.
- One-skillet prep means fewer dishes and quick cleanup.
- Easy to scale up for more servings or to feed a crowd.
- Mild, kid-friendly flavors yet easy to dress up for adults.
- Flexible: add herbs, veggies, or spices as optional boosts.
What Is Cheesy Beef Bowl?
Cheesy Beef Bowl is a quick skillet meal where ground beef is browned with garlic butter, then mixed with cooked rice and topped with shredded cheddar that melts into a creamy layer. It tastes savory and buttery with the sharp creaminess of cheddar on top. The cooking method is stove-top browning and brief melting under a lid; no oven is required. The vibe is classic comfort food — simple, filling, and warm — perfect for weeknight dinners, casual lunches, or a lazy weekend meal when you want something satisfying with minimal fuss.
Ingredients for Cheesy Beef Bowl
Main Ingredients
- 1 lb ground beef
- 1 cup cheddar cheese, shredded
- 2 cups cooked rice
- 2 tablespoons garlic butter
- Salt and pepper to taste
To Serve (Optional)
- Optional: chopped parsley for garnish
Ingredient Notes (Substitutions, Healthy Swaps)
- Ground beef: Use lean ground beef (90/10) to reduce fat, or ground turkey for a lighter option. Keep in mind leaner meat will be drier; add a splash of beef broth or a teaspoon of olive oil if needed.
- Cheddar cheese: Any good melting cheese works — Colby, Monterey Jack, or a mild cheddar blend. For a sharper bite, use extra-sharp cheddar.
- Cooked rice: White, brown, or jasmine rice are all fine. For lower carbs, use cauliflower rice (cook and drain well first).
- Garlic butter: If you don’t have garlic butter, use 2 tbsp unsalted butter plus 1/2 teaspoon garlic powder or one small clove minced.
- Salt and pepper: Season to taste. If you use salty cheese, start with less salt and adjust after melting the cheese.
Step-by-Step Instructions
Step 1 – Heat the skillet and melt the garlic butter
- Place a large skillet over medium heat. Add 2 tablespoons garlic butter and let it melt and foam.
- Visual cue: The butter should be melted and fragrant but not browned.
Step 2 – Brown the ground beef
- Add 1 lb ground beef to the skillet. Season with salt and pepper. Break the meat into pieces with a spoon and cook until fully browned, about 5–7 minutes.
- Pro cue: Cook until the beef has no pink bits and some browned edges form for best flavor.
Step 3 – Stir in the cooked rice
- Add 2 cups cooked rice to the skillet and mix thoroughly with the browned beef. Heat until the rice is warmed through and evenly combined.
Step 4 – Top with shredded cheddar and cover
- Sprinkle 1 cup shredded cheddar cheese evenly over the beef and rice. Cover the skillet and let sit for a few minutes until the cheese melts.
- Visual cue: The cheese should be fully melted and slightly gooey, forming a cheesy layer across the top.
Step 5 – Serve warm
- Remove the lid, give the bowl a quick stir if desired, and serve hot. Garnish with chopped parsley if using.


Pro Tips for Success
- Use a hot but not smoking pan to brown beef quickly and get flavor from caramelization.
- Don’t overcrowd the pan; if the beef steams instead of browns, remove excess liquid or drain a bit of fat.
- If you use very lean beef, add a teaspoon of oil or a small pat of butter to keep the dish from drying.
- For even melting, shred your own cheddar from a block rather than pre-shredded cheese, which may not melt as smoothly.
- Taste and adjust salt after adding cheese to avoid over-salting.
- Keep the lid on just long enough to melt the cheese — a few minutes should be enough.
- Use leftover rice that is slightly dry and chilled; it resists clumping and gives better texture.
- If serving later, undercook the rice slightly earlier so reheating won’t over-soften it.
Flavor Variations
- Optional Spicy Kick: Stir 1/2 teaspoon red pepper flakes or a dash of hot sauce into the beef while cooking.
- Optional Veggie Boost: Add 1 cup chopped bell pepper or frozen peas in Step 3 and cook until tender.
- Optional Herb Freshness: Stir in 2 tablespoons chopped fresh cilantro or parsley right before serving.
- Optional Creamy Twist: Mix in 2–3 tablespoons sour cream with the rice before topping with cheese for extra creaminess.
- Optional Smoky Note: Add 1/2 teaspoon smoked paprika when browning the beef for a warm, smoky flavor.
- Optional Mushroom Add: Sauté 1 cup sliced mushrooms in the garlic butter first, remove, then cook beef and add mushrooms back in Step 3.
Serving Suggestions
- Serve with a simple green salad dressed with lemon vinaigrette to cut the richness.
- Spoon into bowls and add a side of steamed vegetables like broccoli or green beans.
- Top with a fried egg for a hearty brunch-style bowl.
- Offer hot sauce, ketchup, or pickled jalapeños for people to customize heat and tang.
- Plate with crusty bread or garlic toast to mop up any cheesy juices.
- For a lighter meal, serve smaller portions alongside a crisp slaw.
Make-Ahead, Storage & Reheating
- Make-ahead: Brown the beef and mix with rice, then cool and store in an airtight container in the fridge for up to 2 days. Add cheese and melt just before serving for best texture.
- Storage duration: Keep leftovers refrigerated and use within 3–4 days.
- Reheating best practices: Reheat in a skillet over medium-low heat with a splash of water or broth, stirring occasionally until warmed. You can also microwave covered in short intervals, stirring between bursts for even heat.
- Texture notes: Rice will soften over time in the fridge. Reheat gently to avoid making it mushy — brief high heat can dry it out.
Storage and Freezing Instructions
- Freezing: You can freeze the beef-and-rice mixture without cheese. Cool completely, place in a freezer-safe container, and freeze up to 3 months.
- To reheat from frozen: Thaw overnight in the fridge, reheat gently on the stove with a splash of water or broth, then add cheese and melt before serving.
- Why freeze without cheese: Cheese can change texture and become oily when frozen and thawed; adding fresh shredded cheese at serving gives the best melt.
- If you prefer to freeze with cheese, expect some separation and textural change; use within 1–2 months and reheat gently.
Nutrition Facts (Per Serving)
Calories | Protein | Carbs | Fat | Fiber | Sodium
—|—:|—:|—:|—:|—:
Approx. 470 kcal | 29 g | 23 g | 31 g | 1 g | 520 mg
Estimates vary by brands and portions.
FAQ About Cheesy Beef Bowl
Q: How can I make this less greasy?
A: Use lean ground beef (90/10 or 93/7) and drain excess fat after browning. You can also blot with paper towel before adding rice.
Q: My cheese didn’t melt smoothly — why?
A: Pre-shredded cheese often contains anti-caking agents that affect melting. Shred cheese from a block for best melt.
Q: Can I switch rice for something else?
A: Yes. Use cooked quinoa, cauliflower rice (well drained), or farro for a different texture. Adjust cooking times as needed.
Q: How do I prevent the rice from clumping?
A: Use leftover chilled rice or fluff freshly cooked rice with a fork and separate grains before adding. Stir gently when combining.
Q: Is this safe to make ahead for guests?
A: Yes — finish the beef and rice ahead, then reheat and melt cheese just before serving for the best texture.
Q: My dish tastes bland — how can I fix it?
A: Add more salt a pinch at a time, a squeeze of lemon for brightness, or a dash of soy sauce for depth. Taste as you go.
Notes
- For the best cheese melt, cover the skillet for 2–3 minutes after sprinkling the cheese on top.
- If you like a glossy finish, add a small pat of butter on top of the cheese before covering.
- Chop parsley or chives just before serving to keep color and freshness.
- Use a heavy-bottom skillet to promote even browning and avoid hot spots.
- Leftover bowls reheat well when topped with a fresh sprinkle of shredded cheese.
Troubleshooting
- Bland flavor: Add salt gradually and finish with a squeeze of lemon or a splash of soy sauce to lift flavors.
- Overcooked, dry rice: Reheat gently with a splash of water or broth and cover briefly to steam it back to life.
- Beef not browning: The pan was too crowded or not hot enough. Increase heat slightly and work in batches if needed.
- Burning on bottom: Lower the heat and scrape the pan; add a splash of water to loosen stuck bits, then continue cooking.
- Cheese oily or separated: Cheese was overheated or previously frozen; melt gently over low heat and use block-shredded cheese for best results.
- Too greasy: Drain fat after browning and blot with paper towel, or use leaner meat next time.
Conclusion
This Cheesy Beef Bowl is a simple, reliable comfort meal that combines browned beef, fluffy rice, and melty cheddar for a satisfying dish any night of the week; if you want another cheesy, beef-forward idea to try later, check out this take on Cheesy gyudon – Umami Cooking.
Final Thoughts
This recipe wins because it uses a few plain ingredients to deliver bold comfort and fast prep. It’s forgiving, easy to customize, and friendly to busy schedules — a go-to when you want a filling, cheesy meal with minimal effort.
Cheesy Beef Bowl
Ingredients
Main Ingredients
- 1 lb ground beef Use lean ground beef (90/10) to reduce fat.
- 1 cup cheddar cheese, shredded Any good melting cheese works.
- 2 cups cooked rice White, brown, or jasmine rice are all fine.
- 2 tablespoons garlic butter Use unsalted butter plus garlic powder as substitute.
- to taste Salt and pepper Adjust seasoning to your preference.
To Serve (Optional)
- 1 cup chopped parsley For garnish.
Instructions
Preparation
- Heat a large skillet over medium heat and melt 2 tablespoons of garlic butter until fragrant.
- Add 1 lb of ground beef to the skillet, season with salt and pepper, and cook for 5–7 minutes until fully browned.
- Stir in 2 cups of cooked rice, mixing thoroughly with the browned beef, and heat until warmed through.
- Sprinkle 1 cup of shredded cheddar cheese evenly over the beef and rice, cover the skillet, and let sit until the cheese melts.
- Serve warm, garnished with chopped parsley if desired.