
This sugar cookie icing is smooth, shiny, and sweet with a soft vanilla-sugar flavor that finishes clean on the tongue. It dries to either a glossy, slightly hard surface for a crisp bite or stays soft enough to pipe delicate borders and details. The texture is easy to control: thin it for flooding or thicken it for piping with a little extra milk or powdered sugar. It’s a simple, no-fuss icing that turns plain cookies into gifts — try it on classic cutouts or pair it with a spiced cookie for contrast; it pairs especially well with a hearty cookie like brown sugar maple cookies. This recipe is quick, budget-friendly, and forgiving — great for weekday baking or holiday cookie trays.
Why You’ll Love This Sugar Cookie Icing
- Makes a glossy finish that looks professional without special skills.
- Very forgiving: adjust milk or powdered sugar to get the exact consistency you need.
- Uses pantry staples: powdered sugar, milk, and corn syrup.
- Quick to mix — ready in minutes for last-minute decorating.
- Works for both flooding cookie surfaces and piping fine details.
- Food coloring mixes in smoothly for bright, even colors.
- Minimal equipment: bowl, spoon, and piping bags or squeeze bottles.
- Dries fairly fast to a stable surface, so decorated cookies stack safely.
What Is Sugar Cookie Icing?
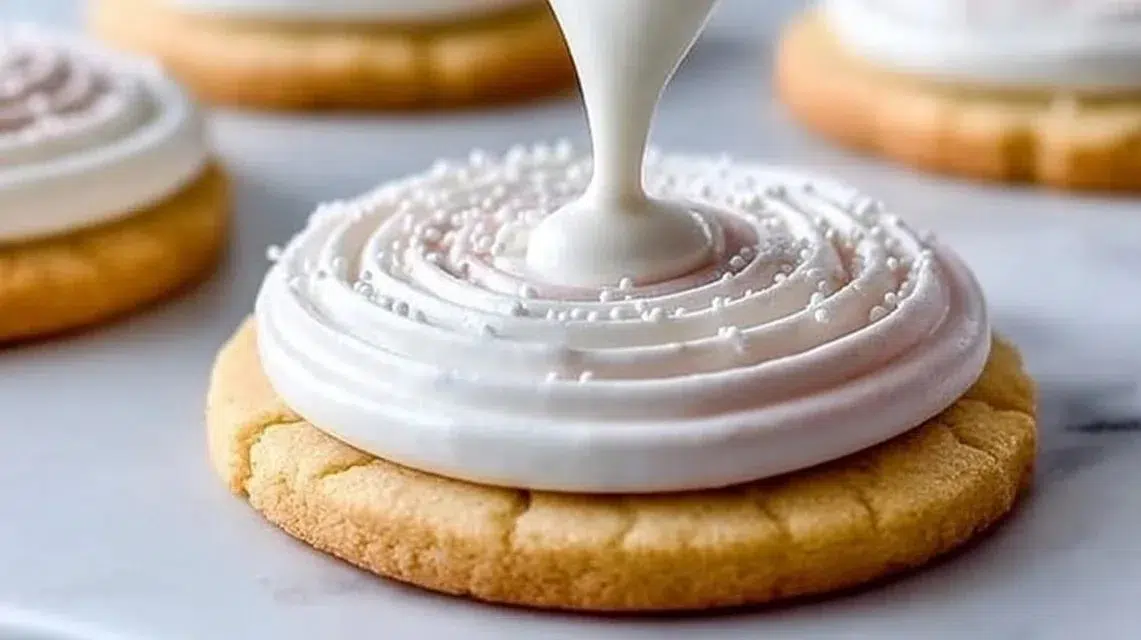
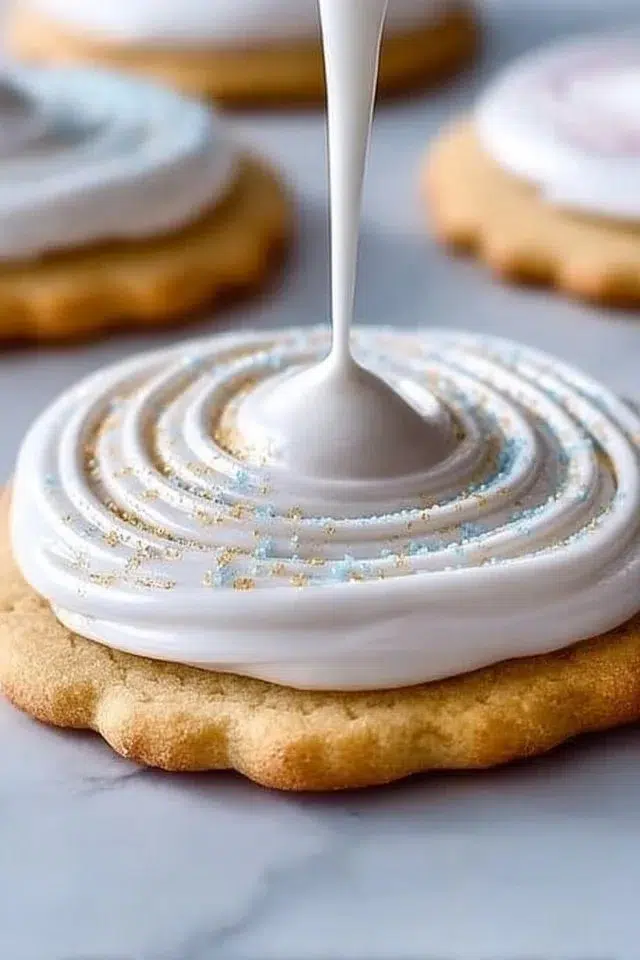
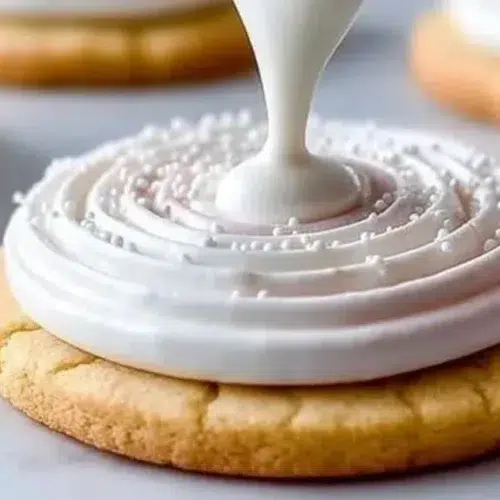
Sugar cookie icing is a simple glaze made from powdered sugar, a small amount of liquid, and a glossy agent — here, corn syrup. It tastes sweet with a clear sugar and light milk note. Texture ranges from runny and glassy (for “flooding” or coating a cookie) to thick and pipeable (for borders, lines, and lettering). This recipe is made by stirring the dry sugar with milk and corn syrup until shiny and smooth — no heat needed. The overall vibe is homey and calm: perfect for an afternoon of decorating with kids, a quick cookie refresh for guests, or a relaxed holiday baking day.
Ingredients for Sugar Cookie Icing
For the Base
- 2 cups powdered sugar (about 230 g)
For the Mix
- 2 tablespoons milk (30 ml)
- 1 tablespoon corn syrup (15 ml)
Optional
- Food coloring (as desired)
Ingredient Notes (Substitutions, Healthy Swaps)
- Powdered sugar: Use store-bought or homemade powdered sugar (blend granulated sugar until fine). If you use homemade, let it sit a minute to settle; it may be less airy than commercial brands.
- Milk: Whole milk gives a slightly richer flavor. For a lighter option, use skim or 1% milk. For non-dairy choices, use unsweetened almond or oat milk — they work but may shift taste slightly.
- Corn syrup: This adds shine and slows crystallization. If you don’t have corn syrup, use a light corn syrup substitute or a small amount (1 tsp) of clear honey — note that honey adds flavor and reduces shine slightly. Do not use dark syrups.
- Food coloring: Gel colors give vivid hues with less liquid. Liquid food color will work but may thin the icing faster, so add carefully.
- Sugar-free swaps: There’s no straightforward 1:1 sugar-free powdered sugar substitute for this method that keeps the same texture and shine. For reduced-sugar needs, make a smaller batch and use the icing sparingly.
Step-by-Step Instructions
Step 1 – Sift the powdered sugar
Measure 2 cups (about 230 g) of powdered sugar and sift it into a medium mixing bowl to remove lumps. This keeps the icing smooth.
Visual cue: The sifted sugar will look light and fluffy, not clumpy.
Step 2 – Add milk and corn syrup
Pour in 2 tablespoons (30 ml) milk and 1 tablespoon (15 ml) corn syrup. Stir with a spoon or small whisk until the mixture becomes glossy and smooth. Scrape down the bowl sides as needed.
Pro cue: Stop stirring once there are no dry streaks left and the surface reflects light.
Step 3 – Adjust the consistency
- For flooding (covering the cookie): Add milk a few drops at a time until the icing moves slowly off the spoon and levels itself within 10–15 seconds.
- For piping (borders, details): Add small amounts of sifted powdered sugar until the icing holds its shape when piped and does not sag.
Visual cue: Flooding icing has a ribbon-like fall and smooths out quickly; piping icing keeps sharp edges.
Step 4 – Add color if desired
Divide icing into small bowls for different colors. Stir in gel or liquid food coloring until fully mixed. Use very small amounts of liquid color to avoid thinning.
Pro cue: Gel colors give strong hues with no extra liquid; if using liquid color, cut back on milk slightly.
Step 5 – Transfer and decorate
Place the icing into piping bags, squeeze bottles, or zip bags with a corner snipped. Pipe borders first with piping consistency, then flood the center with thinner icing. Let cookies sit at room temperature until the icing sets.
Visual cue: Flooded icing should settle into a smooth, shiny surface within minutes.
Pro Tips for Success
- Always sift powdered sugar to remove lumps and keep the icing smooth.
- Start with the base amounts and add milk or sugar slowly — small changes make a big difference.
- Work in small bowls for colors so you don’t waste icing or overmix large batches.
- Use gel food color to avoid diluting the icing; add tiny dots and mix well.
- If icing thickens as it sits, stir in a drop of milk to revive it to the right flow.
- Cover bowls with a damp towel while you work to prevent skin forming on unused icing.
- To get very bright colors, add color in stages and allow it to darken — some colors deepen as they sit.
- Clean piping tips often during long sessions to keep lines sharp.
Flavor Variations
- OPTIONAL: Vanilla boost — Add 1/4 teaspoon vanilla extract to the base for a clear vanilla note (this adds a tiny amount of extra liquid; reduce milk by a drop).
- OPTIONAL: Citrus twist — Add 1/4 teaspoon finely grated lemon or orange zest to the base for a fresh lift. Keep zest light to avoid gritty texture.
- OPTIONAL: Almond hint — Stir in 1/8 teaspoon almond extract for a nutty flavor that pairs well with butter cookies.
- OPTIONAL: Cocoa glaze — Replace 2 tablespoons powdered sugar with 1 tablespoon dutch-process cocoa plus 1 tablespoon sugar to make a chocolate sheen icing (may need a drop more milk).
- OPTIONAL: Spiced glaze — Add a pinch of ground cinnamon or cardamom for a warm flavor — good for autumn cookies.
- OPTIONAL: Peppermint — Add a small drop of peppermint extract for holiday cookies; use sparingly as it is strong.
Serving Suggestions
- Pipe names or messages for a cookie platter at parties.
- Use different colors and let kids help for a family-friendly activity.
- Stack iced cookies between sheets of parchment paper for transport.
- Pair iced sugar cookies with a simple tea or coffee for an easy dessert.
- Use as a glaze on plain butter cookies, shortbread, or cut-out sugar cookies.
- Make themed sets for birthdays or holidays by changing color and detail.
Make-Ahead, Storage & Reheating
- Make-ahead: You can mix the base icing and split into small bowls for colors up to one day ahead. Keep covered tightly in the fridge. Bring to room temperature and stir before using.
- Storage duration: Store leftover made icing in an airtight container in the fridge for up to 5 days. Stir well before use.
- Reheating best practices: Icing does not need heating; simply bring refrigerated icing to room temperature and stir in a drop of milk if too thick. Avoid microwaving — it can change texture.
- Texture changes: Refrigeration can cause the icing to thicken. If it dries out slightly or forms a skin, add a few drops of milk and mix to restore smoothness.
Storage and Freezing Instructions
- Freezing is not recommended for fully mixed icing because thawing can change texture and separate the shine.
- Instead of freezing, store icing in the fridge for up to 5 days in a sealed container. To keep longer, consider storing the dry powdered sugar separately and mix fresh with milk and corn syrup when ready.
- If you must freeze small sealed portions, thaw in the fridge overnight and stir thoroughly at room temperature; expect minor texture change and possibly reduced gloss.
Nutrition Facts (Per Serving)
Calories | Protein | Carbs | Fat | Fiber | Sodium
—|—:|—:|—:|—:|—:
52 kcal | 0.2 g | 13 g | 0.04 g | 0 g | 5 mg
Estimates vary by brands and portions.
FAQ About Sugar Cookie Icing
Q: Why is my icing too thick?
A: You likely added too much powdered sugar or let it sit and thicken. Stir in a few drops of milk until you reach the desired flow.
Q: Why is my icing too runny?
A: You added too much liquid or color. Add a little sifted powdered sugar to thicken and test again.
Q: How long does it take the icing to set?
A: Surface set in about 20–60 minutes depending on humidity and thickness. Full hardening can take several hours.
Q: Can I use powdered sugar with cornstarch?
A: Yes. Most powdered sugar contains a small amount of cornstarch. It works fine for this recipe.
Q: Can I make this without corn syrup?
A: Yes, but corn syrup adds shine and slows crystallization. Substitute carefully with light honey or omit, expecting less gloss.
Q: How do I avoid air bubbles when flooding?
A: Stir gently to avoid adding air. Tap the cookie gently to pop small bubbles or use a toothpick to nudge them out.
Notes
- For very smooth floods, let the icing sit for a minute after mixing so air bubbles rise and pop.
- Use squeeze bottles for faster flooding on many cookies; piping bags are better for fine detail.
- Label small bowls with color names when making many shades — it keeps your workflow tidy.
- Keep a damp cloth under your work bowls to catch drips and make cleanup easier.
- If you want a matte finish, replace corn syrup with a thin glaze of milk and let dry longer; gloss will lessen.
Troubleshooting
- Icing is grainy: You likely did not sift powdered sugar or the sugar clumped; re-sift and remix.
- Icing won’t pipe clean lines: It’s too thin; add sifted powdered sugar a tablespoon at a time.
- Icing cracks when dry: It may be too thick when applied; thin slightly next time.
- Colors fade after drying: Some dyes can fade; use gel colors and allow full drying time.
- Icing separates or becomes watery: Stir vigorously and add a touch more powdered sugar to bring it back.
- Icing is sticky after setting: It may not have fully dried; allow more time in a dry room and avoid stacking until set.
Final Thoughts
This simple sugar cookie icing is a reliable go-to for decorating at home. It’s easy to shape and color, forgiving when you need to adjust, and finishes with a clean, shiny look that makes cookies special. Try it on a batch of cutouts, and you’ll see why it’s a favorite for quick, beautiful cookie decorating.
Conclusion
For another take on sugar-cookie-style icing and more decorating ideas, see this helpful guide from Preppy Kitchen sugar cookie icing.
Sugar Cookie Icing
Ingredients
For the Base
- 2 cups powdered sugar (about 230 g)
For the Mix
- 2 tablespoons milk (30 ml)
- 1 tablespoon corn syrup (15 ml)
Optional
- as desired food coloring
Instructions
Preparation
- Sift the powdered sugar into a medium mixing bowl to remove lumps.
- Pour in the milk and corn syrup. Stir until glossy and smooth.
Adjusting Consistency
- For flooding, add milk a few drops at a time until the icing moves slowly off the spoon.
- For piping, add sifted powdered sugar until the icing holds its shape.
Coloring
- Divide icing into small bowls for different colors and stir in food coloring.
Decorating
- Transfer icing into piping bags and decorate cookies as desired.