
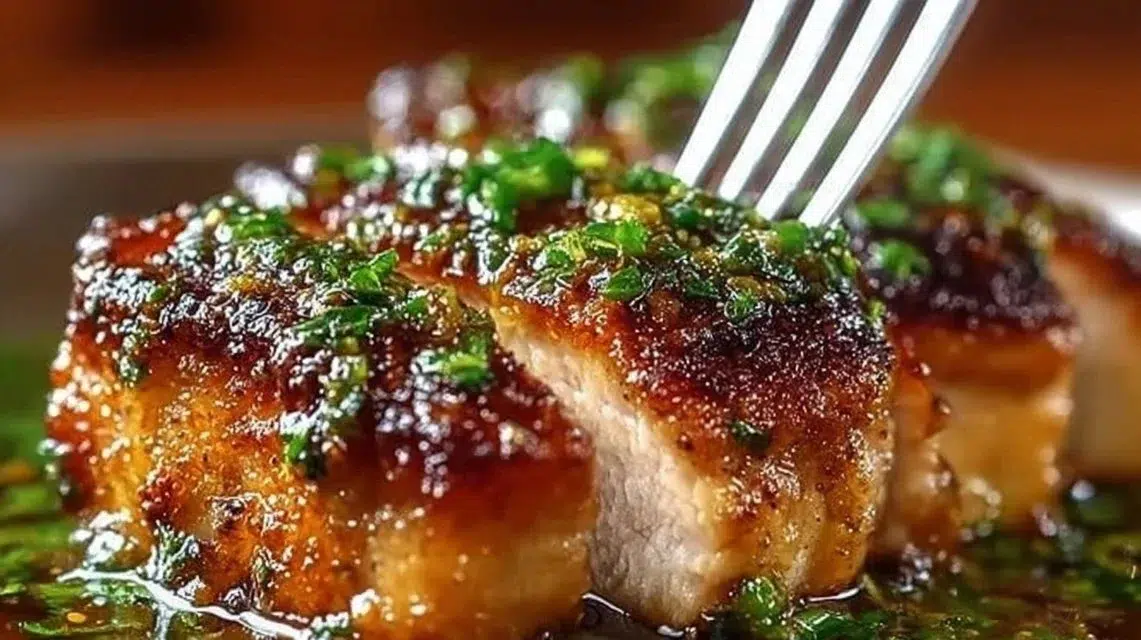
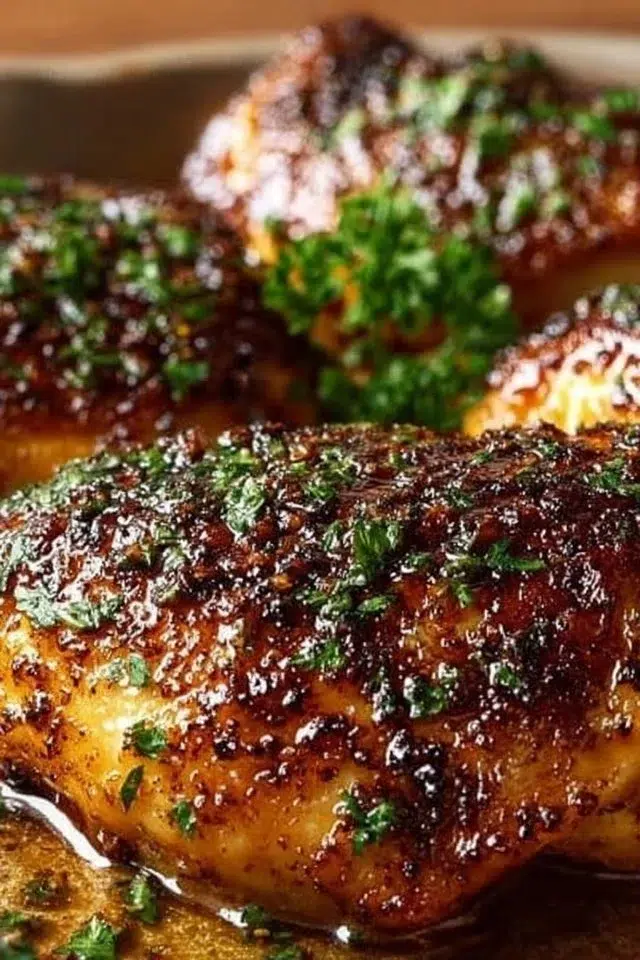
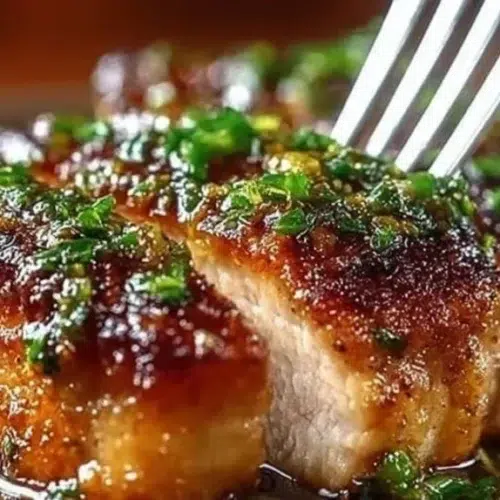
Garlic Brown Sugar Chicken is a bright mix of sweet and savory with a sticky, glossy glaze that clings to juicy chicken. The garlic gives a warm savory bite, while the brown sugar melts into a pleasant caramel note. The sauce finishes shiny and rich with a little butter, so every forkful is both tender and saucy. This recipe is quick and simple, great for weeknights but pretty enough for a casual dinner with friends. Serve it over rice or mashed potatoes for saucy comfort, or with a crisp salad to balance the sweetness. If you like sweet-savory chicken, try this creamy brown sugar dijon chicken thighs for another easy weeknight option.
Why You’ll Love This Garlic Brown Sugar Chicken
- Fast to make: stove-to-table in about 20–30 minutes.
- Big flavor: brown sugar and soy sauce create deep sweet-salty balance.
- Simple ingredients you likely have on hand.
- Sticky, glossy glaze that coats the chicken for great texture.
- Versatile: works with breasts or thighs and pairs with many sides.
- Low-fuss finish: a knob of butter at the end makes the sauce rich and shiny.
- Adjustable heat: add crushed red pepper flakes for a spicy kick.
What Is Garlic Brown Sugar Chicken?
Garlic Brown Sugar Chicken is a pan-seared chicken dish finished in a quick caramel-like sauce of brown sugar, soy sauce, apple cider vinegar, and garlic. It tastes sweet, slightly tangy, and garlicky with a bit of smokiness from smoked paprika. The chicken cooks in the sauce so the flavors soak in and the glaze thickens to a shiny finish. It feels like comfort food but is easy enough for a weeknight. The vibe is warm, homey, and a little fancy when served with a fresh garnish.
Ingredients for Garlic Brown Sugar Chicken
For the Base
- 4 boneless (skinless) chicken breasts (or thighs)
- 3 tablespoons olive oil
For the Sauce
- 5 cloves garlic, finely minced
- 1/3 cup light brown sugar (packed)
- 2 tablespoons soy sauce
- 1 tablespoon apple cider vinegar
- 1 teaspoon smoked paprika
- 1/2 teaspoon salt
- 1/2 teaspoon black pepper
- 1/2 teaspoon onion powder
- 1/4 teaspoon crushed red pepper flakes (optional, for heat)
To Finish
- 1 tablespoon unsalted butter (for finishing)
- Fresh parsley, chopped (for garnish – optional)
Ingredient Notes (Substitutions, Healthy Swaps)
- Chicken: thighs are a bit more forgiving and stay juicier. Use breasts for leaner meat.
- Olive oil: any neutral oil works (canola, vegetable). For a richer taste, use avocado oil.
- Brown sugar: use dark brown sugar for a deeper molasses note (optional).
- Soy sauce: low-sodium soy sauce reduces salt if you’re watching sodium. Taste before adding extra salt.
- Apple cider vinegar: white wine vinegar or rice vinegar also work; they keep the tang but slightly change the flavor.
- Butter: omit for dairy-free; finish with a little extra oil to keep sauce glossy.
- Heat: crushed red pepper flakes are optional. Add a pinch of cayenne instead if you prefer.
Step-by-Step Instructions
Step 1 – Prepare the chicken
Pat the chicken dry with paper towels. Season both sides evenly with 1/2 teaspoon salt, 1/2 teaspoon black pepper, 1 teaspoon smoked paprika, and 1/2 teaspoon onion powder. Let it sit 5 minutes at room temperature while you prep the pan.
Visual cue: the chicken should look evenly coated with the spices.
Step 2 – Sauté the garlic
Heat 3 tablespoons olive oil in a large skillet over medium heat. Add the minced garlic and cook for 30–45 seconds just until fragrant. Do not let the garlic brown or it will taste bitter.
Pro cue: keep the heat at medium—garlic cooks very fast.
Step 3 – Build the sauce
Stir the 1/3 cup light brown sugar, 2 tablespoons soy sauce, and 1 tablespoon apple cider vinegar into the skillet with the garlic. Allow the mixture to gently bubble and dissolve into a smooth sauce. Lower the heat if it bubbles too hard.
Visual cue: the sugar should dissolve and the sauce will become syrupy.
Step 4 – Cook the chicken
Place the seasoned chicken into the skillet. Cook for 5–6 minutes per side, spooning the sauce over the chicken as it cooks. Continue until fully cooked through and the internal temperature reaches 165°F (74°C).
Pro cue: if the sauce thickens too fast and risks burning, add a splash of water or reduce heat and spoon gently.
Step 5 – Finish the glaze
Add 1 tablespoon unsalted butter to the pan and spoon the thickened, glossy sauce over the chicken for 1–2 minutes until the sauce is rich and shiny. Turn off the heat.
Visual cue: the sauce should cling to the chicken and look smooth and glossy.
Step 6 – Serve
Remove from heat. Garnish with fresh parsley if desired and serve immediately with extra sauce spooned over the top.
Pro Tips for Success
- Dry chicken before seasoning so the spices stick and the sear is better.
- Use medium heat to keep the garlic from burning and to allow sugar to melt evenly.
- Spoon the sauce over the chicken while cooking to infuse flavor and keep meat moist.
- Use a meat thermometer to confirm 165°F (74°C) for safe, juicy chicken.
- If the sauce gets too thick before chicken is done, add 1–2 tablespoons of water to loosen it.
- Let cooked chicken rest 3–5 minutes before serving to keep juices inside.
- Taste the sauce before finishing—adjust soy sauce or vinegar in small amounts if you want saltier or tangier.
Flavor Variations
- OPTIONAL: Add a splash of orange juice (1–2 tablespoons) to the sauce for a citrus twist.
- OPTIONAL: Stir in a teaspoon of Dijon mustard at the end for a tangy, savory note.
- OPTIONAL: Add sliced mushrooms to the pan after garlic to create a mushroom-brown sugar sauce.
- OPTIONAL: Use coconut aminos instead of soy sauce for a soy-free, slightly sweeter profile.
- OPTIONAL: Add chopped fresh thyme or rosemary in the last minute for herbal aroma.
- OPTIONAL: For extra heat, add 1/2 teaspoon crushed red pepper flakes to the sauce while it simmers.
Serving Suggestions
- Serve over steamed white or brown rice to soak up the sticky sauce.
- Pair with mashed potatoes or creamy polenta for a cozy plate.
- Add a side of roasted vegetables (broccoli, carrots, or green beans) for color and bite.
- Place atop a bed of mixed greens for a warm chicken salad.
- Serve with garlic bread or crusty bread to mop up the glaze.
- Pair with a simple cucumber salad to cut the sweetness for a lighter meal.
Make-Ahead, Storage & Reheating
- Make-ahead: You can mix the sauce (brown sugar, soy sauce, vinegar, garlic) and store in an airtight jar in the fridge for up to 24 hours. Cook fresh chicken when ready.
- Store cooked chicken in an airtight container in the refrigerator for up to 3–4 days.
- Reheating: Reheat gently in a skillet over low heat with a splash of water or stock to loosen the sauce. Cover and warm until heated through to prevent drying.
- Texture changes: Reheated chicken may be slightly drier than fresh. Reheat with added liquid and low heat to keep it moist.
Storage and Freezing Instructions
- To refrigerate: Cool the chicken to room temperature, then place in a sealed container. Keep in the fridge for 3–4 days.
- To freeze: You can freeze cooked chicken with sauce for up to 2 months. Use a freezer-safe container and leave a little headspace for expansion.
- Thawing: Thaw overnight in the fridge before reheating.
- If freezing raw: It’s better to freeze raw seasoned chicken separately and add the sauce after thawing and cooking to preserve texture.
- Note: Freezing can change the texture of the sauce slightly; it may separate when thawed. Reheat slowly and whisk or stir to re-emulsify.
Nutrition Facts (Per Serving)
Calories | Protein | Carbs | Fat | Fiber | Sodium
—|—:|—:|—:|—:|—:
466 kcal | 53 g | 17 g | 13 g | 0.5 g | 740 mg
Estimates vary by brands and portions.
FAQ About Garlic Brown Sugar Chicken
Q: Why is my sauce too thin?
A: Cook a little longer on medium-low to reduce liquid. Spoon sauce over the chicken to help thicken it evenly. If needed, add 1 teaspoon cornstarch mixed with 1 tablespoon cold water and stir in, cooking 1–2 minutes.
Q: Why did the garlic taste bitter?
A: Garlic burns quickly. Keep heat at medium and sauté only 30–45 seconds until fragrant. Remove from direct heat if it starts to brown.
Q: Can I use frozen chicken?
A: It’s best to thaw fully and pat dry before cooking. Cooking from frozen will release water and thin the sauce.
Q: How can I reduce salt?
A: Use low-sodium soy sauce and taste before adding extra salt. You can also reduce added salt by half.
Q: How do I know when the chicken is done?
A: Use a meat thermometer. The safe internal temperature is 165°F (74°C) in the thickest part.
Q: Can I make this dairy-free?
A: Yes—omit the butter at the end or use a dairy-free spread or a little extra oil to finish the sauce.
Notes
- Let the sugar fully dissolve into the soy mixture for a smooth glaze.
- If using thicker chicken breasts, pound gently to even thickness for uniform cooking.
- For a prettier plate, spoon extra sauce into a shallow well on the plate before placing chicken.
- Garnish with chopped parsley just before serving to add fresh color.
- Use a heavy skillet (cast iron or stainless) for even heat and a better sear.
Troubleshooting
Issue: Chicken is dry after cooking.
Fix: Lower the heat and cook to 165°F, not beyond. Rest the meat 3–5 minutes before slicing.
Issue: Sauce tastes too sweet.
Fix: Add 1 teaspoon apple cider vinegar or a splash more soy sauce to balance the sweetness.
Issue: Sauce burned or stuck to pan.
Fix: Reduce heat and deglaze with a splash of water or vinegar, stirring to lift browned bits. Use a lower flame next time.
Issue: Sauce too salty.
Fix: Add a small amount of brown sugar or a splash of water to dilute. Serve over low-salt sides like plain rice to balance.
Issue: Garlic pieces are too large or raw-tasting.
Fix: Mince garlic finely and add it to the pan as instructed; cook until fragrant only.
Final Thoughts
Garlic Brown Sugar Chicken is a simple, flavorful dish that balances sweet and savory with very little fuss. It comes together quickly, uses basic pantry items, and makes a satisfying meal any night of the week.
Conclusion
For another easy, slow-cooker take on sweet garlic chicken that uses similar flavors, try this Slow Cooker Brown Sugar Garlic Chicken.
Garlic Brown Sugar Chicken
Ingredients
For the Base
- 4 pieces boneless (skinless) chicken breasts (or thighs) Thighs are juicier, breasts are leaner.
- 3 tablespoons olive oil Can substitute with any neutral oil.
For the Sauce
- 5 cloves garlic, finely minced Fresh garlic is recommended for best flavor.
- 1/3 cup light brown sugar (packed) Use dark brown sugar for deeper flavor if desired.
- 2 tablespoons soy sauce Use low-sodium soy sauce to reduce salt.
- 1 tablespoon apple cider vinegar Can substitute with white wine vinegar or rice vinegar.
- 1 teaspoon smoked paprika
- 1/2 teaspoon salt
- 1/2 teaspoon black pepper
- 1/2 teaspoon onion powder
- 1/4 teaspoon crushed red pepper flakes Optional, for heat.
To Finish
- 1 tablespoon unsalted butter For finishing the sauce; omit for dairy-free.
- Fresh parsley, chopped For garnish - optional.
Instructions
Preparation
- Pat the chicken dry with paper towels. Season both sides with salt, black pepper, smoked paprika, and onion powder. Let it sit for 5 minutes.
Sauté the garlic
- Heat olive oil in a large skillet over medium heat. Add minced garlic and cook for 30-45 seconds until fragrant. Do not let it brown.
Build the sauce
- Stir in brown sugar, soy sauce, and apple cider vinegar into the skillet with the garlic. Allow it to bubble gently into a smooth sauce.
Cook the chicken
- Place the seasoned chicken into the skillet. Cook for 5-6 minutes per side, basting with sauce until the chicken reaches an internal temperature of 165°F (74°C).
Finish the glaze
- Add butter to the pan, spoon the thickened sauce over the chicken, and cook for an additional 1-2 minutes.
Serve
- Remove from heat, garnish with parsley, and serve immediately with extra sauce.