

Mini Layer Cake is the keyword you’ll love because this approachable guide shows you exactly how to turn a simple sheet cake into adorable, two-layer personal cakes with fluffy vanilla buttercream and plenty of room for creativity. Whether you’re baking for birthdays, bridal showers, or a just-because treat, these minis deliver big cake flavor in a small, stylish package.
Why You’ll Love This Mini Layer Cake
Mini layer cakes combine the wow-factor of a celebration cake with the ease of a sheet cake. Instead of stacking and crumb-coating a tall cake, you’ll punch out neat rounds and build tidy, individual desserts—no advanced decorating skills required. They bake quickly, cool faster, and let you offer multiple flavors and toppings without making separate full-sized cakes. They’re also terrific for portion control, gifts, bake sales, and plated desserts. If you’ve ever wanted bakery-level presentation on a weeknight schedule, this method is your new best friend.
Ingredients for Mini Layer Cake
Below is a classic vanilla version that’s versatile and crowd-pleasing. You’ll bake one 9×12-inch sheet cake (or 9×13 works) and turn it into about 6 mini layer cakes, each made from two cake rounds.
For the Vanilla Sheet Cake
- 2 ¼ cups all-purpose flour
- 2 teaspoons baking powder
- ½ teaspoon fine salt (or kosher salt)
- ½ cup unsalted butter, softened
- 1 ½ cups granulated sugar
- ¼ cup neutral oil (vegetable or canola)
- 3 large eggs, at room temperature
- 2 teaspoons pure vanilla extract
- 1 cup whole milk, at room temperature
For the Fluffy Vanilla Buttercream
- 1 cup unsalted butter, softened
- 3–3 ½ cups confectioners’ sugar, sifted (to taste for sweetness and texture)
- 2–3 tablespoons milk or heavy cream
- 1 ½ teaspoons pure vanilla extract
- Pinch of fine salt
Optional Decorations
- Fresh berries, sliced fruit, or citrus zest
- Edible flowers (spray-free and safe for food use)
- Mini meringues or macarons
- Chocolate shavings, sprinkles, or toasted nuts
- Jam, lemon curd, or caramel for hidden centers
Ingredient Notes (Substitutions, Healthy Swaps)
- Dairy alternatives: Swap milk with an unsweetened plant milk (oat, almond, or soy). Use a high-fat plant spread that’s suitable for baking in place of butter.
- Egg-free option: Replace the 3 eggs with ¾ cup unsweetened applesauce or with a commercial egg replacer per package directions; expect a slightly denser crumb.
- Whole-grain boost: Substitute up to ⅓ of the flour with whole wheat pastry flour for extra fiber while keeping tenderness.
- Less-sweet buttercream: Start with 3 cups confectioners’ sugar and add more only as needed for structure. You can also replace ¼ of the butter with softened reduced-fat cream cheese for a lighter tang and stability.
- Flavor swaps: Add ½–1 teaspoon almond extract along with vanilla, or infuse the milk with citrus peel and strain.
- Allergy-friendly garnish: If nuts are an issue, use chocolate shards, fruit, and sprinkles instead.
Step-by-Step Instructions
Step 1 – Mix and Bake the Sheet Cake
- Prep: Heat the oven to 350°F (175°C). Grease and line a 9×12-inch or 9×13-inch pan with parchment, leaving overhang for easy lifting.
- Dry ingredients: In a bowl, whisk flour, baking powder, and salt. Set aside.
- Cream: In a large bowl, beat butter and sugar on medium-high until pale and fluffy, 2–3 minutes. Scrape the bowl. Beat in the oil until glossy.
- Add eggs: Beat in eggs one at a time until fully combined, then mix in vanilla.
- Combine: Add the dry ingredients in two additions, alternating with the milk. Mix on low just until the batter is smooth and no dry streaks remain.
- Bake: Spread into the pan, level the top, and bake 22–27 minutes, or until the center springs back and a toothpick comes out clean.
- Cool: Cool 10 minutes in the pan, then lift out and cool completely on a rack. For the cleanest cuts, chill the cooled cake 30–45 minutes.
Step 2 – Make the Buttercream
- Beat butter until creamy and slightly paler, 1–2 minutes.
- Add 2 cups confectioners’ sugar and beat on low until combined; increase speed and whip 1 minute.
- Add vanilla, a pinch of salt, and 1 tablespoon milk/cream.
- Beat in remaining sugar, ½ cup at a time, adding more milk/cream as needed to reach a soft, pipeable consistency. Whip 1–2 minutes for a light, fluffy texture.
- Taste and adjust salt or vanilla.
Step 3 – Cut the Cake Rounds
- Use a round cutter 2 to 3 inches (5–7.5 cm) in diameter.
- Press straight down (don’t twist) to get clean edges. Pre-position your cutter layout to maximize the number of rounds.
- Gather 12 even rounds for six two-layer minis (or 18 rounds for three-layer minis). Save trimmings for cake pops or trifles.
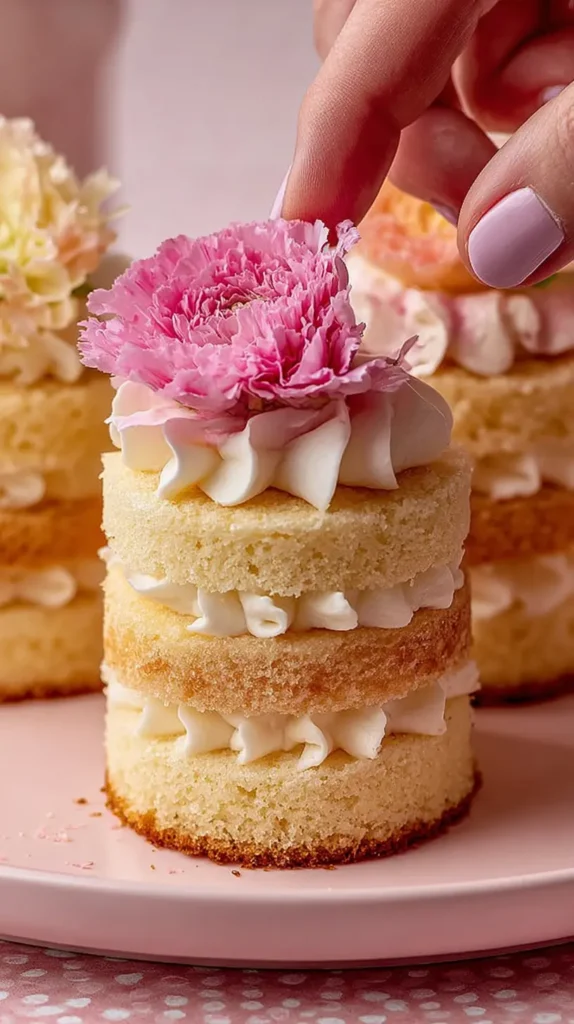
Step 4 – Fill and Stack
- Place six rounds on a board. Pipe or spread a generous layer of buttercream on each. For extra flair, add a small spoonful of jam, lemon curd, or caramel in the center, then surround it with buttercream so it doesn’t leak.
- Top with the remaining rounds to form two-layer cakes. Press gently to set.
- Pipe a swirl or smooth a dollop of buttercream on top. If you like, chill briefly to firm before decorating.
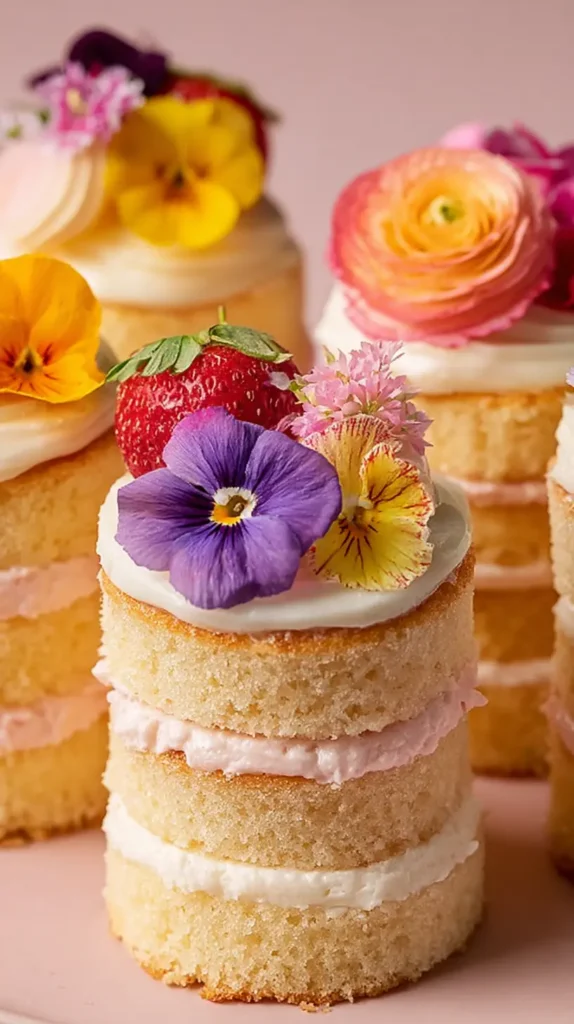
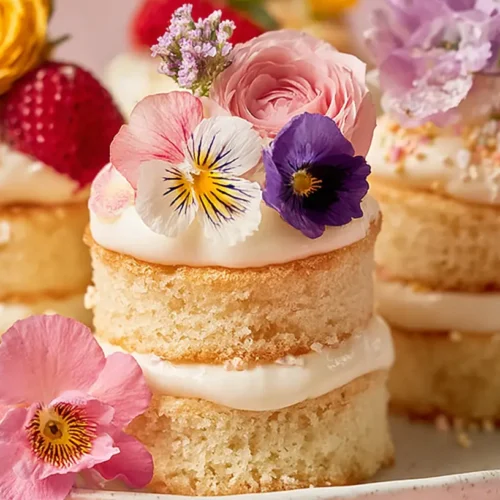
Step 5 – Decorate
- Add fresh berries, tiny meringues, sprinkles, chocolate curls, or edible flowers.
- Keep decorations proportional to the mini scale—small pieces look elegant and stay put.
- For flowers, use only varieties known to be edible or non-toxic and free from pesticides. Place a thin barrier of buttercream between stems and cake if needed.
Step 6 – Serve
- Present on a cake stand, dessert plates, or in cupcake boxes for gifts.
- Serve at cool room temperature so the buttercream is soft and the crumb is tender.
Pro Tips for Success
- Chill to win: Briefly chilling the sheet cake makes cutting rounds much cleaner and reduces crumbs.
- Don’t twist the cutter: A straight push produces sharp sides; twisting can tear the crumb.
- Pipe a dam: When adding jam or curd, pipe a buttercream “ring” around the edge to keep fillings neatly inside.
- Even layers: If one round is slightly taller, place it on the bottom. Consistency makes minis look professional.
- Scale smartly: Want more minis? Bake two sheets, or use a slightly smaller cutter (2 inches) to yield extra portions.
- Travel-friendly: Let the minis chill 15–20 minutes before boxing; they’ll set up and transport better.
Flavor Variations
- Chocolate Fudge Mini: Swap ½ cup of flour for unsweetened cocoa and increase milk by 2 tablespoons. Fill with chocolate ganache or fudge sauce and top with chocolate curls.
- Lemon-Berry Mini: Add 1 tablespoon lemon zest to the batter; fill with lemon curd and fresh raspberries. Frost with lemon-vanilla buttercream.
- Strawberries & Cream: Spoon strawberry jam between layers and crown with sliced strawberries and a whisper of lime zest.
- Almond Joy-Inspired: Add ½ teaspoon almond extract to the batter, fill with coconut spread, and top with toasted coconut and chocolate shards.
- Birthday Sprinkle Mini: Fold ¼ cup rainbow sprinkles into the batter and finish with more sprinkles on top.
Serving Suggestions
- Plated dessert: Drag a brush of berry coulis across the plate, set a mini cake on top, and add a few fresh berries for a restaurant-style finish.
- Party trio: Offer three flavors (e.g., vanilla-berry, chocolate, and lemon) so guests can pick their favorite.
- Giftable sweets: Pop minis into cupcake boxes or clear clamshells; tie with ribbon and a flavor tag.
- Afternoon tea: Serve alongside macarons, tea sandwiches, and fruit. The mini size fits the refined vibe perfectly.
Storage and Freezing Instructions
- Room temperature: Keep decorated mini layer cakes at cool room temp (68–70°F / 20–21°C) for up to 6 hours if the room is not warm and your buttercream is stable.
- Refrigerator: Store covered for 2–3 days. For best texture, let sit at room temperature 20–30 minutes before serving so the buttercream softens.
- Freezer (cake only): Freeze undecorated cake rounds, double-wrapped, up to 2–3 months. Thaw in the fridge overnight, then bring to room temperature before filling.
- Make-ahead plan: Bake and freeze the sheet cake, then cut and assemble the day you need them. Add fresh fruit or flowers just before serving.
Nutrition Facts (Per Serving)
Approximate values for one two-layer mini cake with vanilla buttercream.
| Calories | Protein (g) | Carbs (g) | Fat (g) | Fiber (g) | Sodium (mg) |
|---|---|---|---|---|---|
| 520 | 6 | 67 | 25 | 1 | 260 |
Nutrition will vary based on cutter size, frosting amount, and decorations.
FAQ About Mini Layer Cake
How many mini layer cakes does one sheet make?
With a 2 ½ to 3-inch cutter, a 9×12-inch sheet typically yields about six two-layer mini cakes (12 rounds total). Your yield depends on the cutter size and how tightly you arrange the circles. If you use a smaller 2-inch cutter, you’ll likely get a couple more minis. Save the trimmings for cake pops, parfaits, or a baker’s snack.
Can I make mini layer cakes without a round cutter?
Yes. Use a sturdy glass or metal measuring cup with a sharp rim, or trace around a small jar lid with a paring knife. If you bake the sheet cake in a square pan, you can cut neat squares or rectangles with a ruler and sharp knife, which also stack beautifully. Chill the cake for cleaner edges before cutting.
What frosting works best for these minis?
A classic American buttercream is fast and reliable, which is why it’s featured here. If you prefer less sweetness, Swiss meringue buttercream is silky and more subtle but takes a few extra steps. Cream cheese frosting is tangy and terrific for lemon or berry versions, though it’s slightly softer—chill the minis briefly after decorating for cleaner handling.
How do I stop fillings from oozing out?
Pipe a ring of buttercream around the edge of the bottom layer to create a barrier, then spoon jam, curd, or caramel inside that dam. Press the top layer gently and chill the minis 10–15 minutes to set the filling. Avoid overfilling; a small spoonful goes a long way with mini cakes.
Can I bake the cake a day ahead?
Absolutely. Bake the sheet cake, cool completely, wrap tightly, and refrigerate up to 24 hours or freeze up to 2–3 months. Cutting rounds from a chilled cake is actually easier and neater. Assemble and decorate the day you plan to serve for the freshest look, then add any delicate fruit or flowers just before presenting.
What decorations are safe if I use flowers?
Choose flowers that are known to be edible or non-toxic and free from pesticides (like pansies, violas, marigolds, and unsprayed roses). Place a small dab of buttercream where the flower will sit to create a barrier, and avoid pushing stems directly into the cake unless they’re food-safe and wrapped. Remove flowers before eating if you’re unsure.
How can I make these minis gluten-free or dairy-free?
For gluten-free minis, use a high-quality 1:1 gluten-free baking flour blend and let the batter rest 10 minutes before baking to hydrate the starches. For dairy-free, replace butter with a plant-based baking stick and use plant milk. Check labels on decorations, sprinkles, and fillings to ensure they’re allergen-safe.
Do mini cakes dry out faster than a full cake?
Because minis have more exposed surface area, they can dry more quickly if left uncovered. Keep them covered during storage, assemble closer to serving time, and add a little extra buttercream to protect cut edges. A short rest at room temperature before serving also helps the crumb feel softer and more tender.
Final Thoughts
Mini layer cakes deliver style and versatility with minimal stress. By baking a single sheet cake and cutting out clean rounds, you can assemble beautiful, individual desserts in less time than it takes to decorate a traditional layer cake. Switch up flavors to match the season, crown each cake with a tiny flourish, and enjoy bakery-level presentation at home. Once you master the rhythm—bake, chill, cut, fill, decorate—you’ll have a dependable, repeatable method you can adapt for any occasion.
Mini Layer Cake
Ingredients
For the Vanilla Sheet Cake
- 2 1/4 cups all-purpose flour
- 2 tsp baking powder
- 1/2 tsp fine salt
- 1/2 cup unsalted butter, softened
- 1 1/2 cups granulated sugar
- 1/4 cup neutral oil (vegetable or canola)
- 3 large eggs, at room temperature
- 2 tsp pure vanilla extract
- 1 cup whole milk, at room temperature
For the Fluffy Vanilla Buttercream
- 1 cup unsalted butter, softened
- 3 cups confectioners’ sugar, sifted adjust to taste and texture
- 2 tbsp milk or heavy cream
- 1 1/2 tsp pure vanilla extract
- 1 pinch fine salt
Optional Decorations
- Fresh berries, edible flowers, sprinkles, chocolate shavings for topping
Instructions
- Step 1: Preheat oven to 350°F (175°C). Grease and line a 9×12-inch or 9×13-inch pan with parchment paper.
- In a bowl, whisk together flour, baking powder, and salt.
- Cream butter and sugar until light and fluffy, then beat in oil.
- Beat in eggs one at a time, then mix in vanilla.
- Add dry ingredients alternately with milk, mixing just until smooth.
- Spread batter in the pan, bake 22–27 minutes. Cool 10 minutes, then lift to cool completely. Chill for cleaner cutting.
- Step 2: Beat butter for frosting until creamy. Add sugar gradually with vanilla, salt, and milk. Whip until fluffy.
- Step 3: Use a 2–3 inch cutter to punch out 12 rounds. Don’t twist the cutter. Chill cake beforehand for best results.
- Step 4: Layer six rounds with buttercream. Add optional filling in the center before topping with second layer.
- Step 5: Decorate tops with swirls of frosting and your choice of berries, sprinkles, or other decor.
- Step 6: Serve at room temperature for best texture. Chill briefly before transporting.