
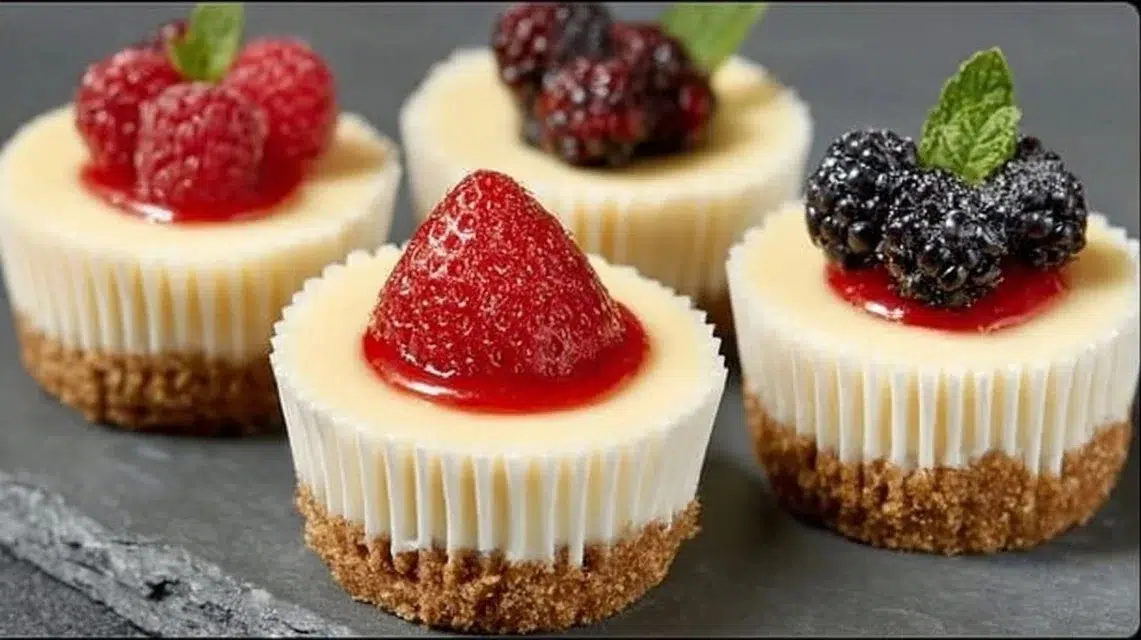
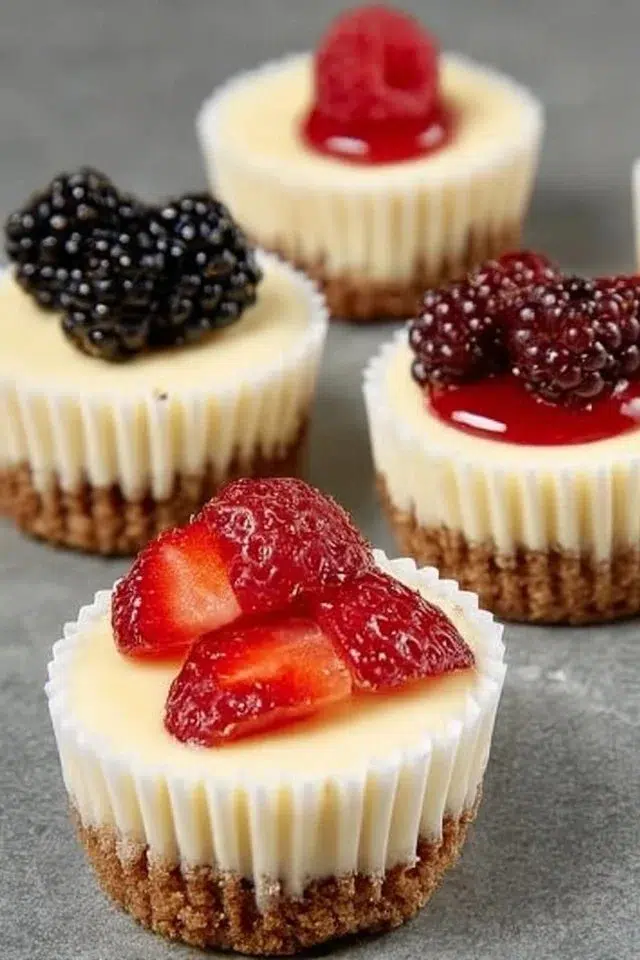
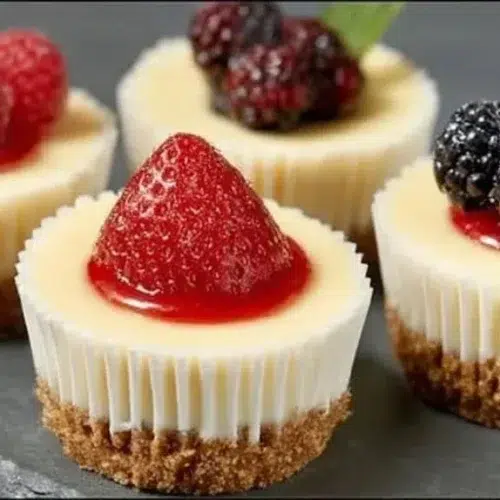
Mini cheesecakes are creamy, rich, and perfectly portioned little desserts with a buttery graham cracker crust and a smooth, tangy cream cheese filling. They have a velvety texture that melts in your mouth and a mild sweetness that pairs well with fresh berries or a drizzle of caramel. This recipe is straightforward, needs only a few pantry staples, and bakes quickly in a muffin tin. They’re ideal for parties, meal-prep treats, or a weekend dessert — top with fruit or a spoonful of jam for a quick finish. For a fun twist, serve warm with a berry compote or chilled with a sprinkle of lemon zest for brightness. You can also try them alongside a stack of mini pancakes like these blueberry lemon pancake bites for a brunch spread.
Why You’ll Love This Mini Cheesecakes
- Easy to make with just a mixer and a muffin tin — no springform pan required.
- Classic cheesecake flavor: tangy, creamy filling balanced by a sweet, buttery crust.
- Quick bake time (20–25 minutes) makes these great for last-minute desserts.
- Portable single servings that are perfect for parties, kids, or packed lunches.
- Flexible toppings let you switch flavors without changing the base recipe.
- Chill time improves texture—make ahead for stress-free entertaining.
- Uses common pantry ingredients you likely already have.
What Is Mini Cheesecakes?
Mini cheesecakes are individual-sized versions of classic baked cheesecake. Each one has a crisp, buttery graham cracker base and a dense, creamy cream cheese filling. The taste is rich and slightly tangy from the cream cheese, rounded by vanilla and sweetened with sugar. These bake in a muffin tin at a moderate oven temperature and finish firm around the edges with a gently set center. The overall vibe is comforting and crowd-pleasing — good for casual weeknight desserts, brunch spreads, bake sales, or special occasions where guests want single-serve portions.
Ingredients for Mini Cheesecakes
For the Base
- 1 1/2 cups graham cracker crumbs
- 1/3 cup sugar
- 1/2 cup butter, melted
For the Filling
- 2 (8 ounce) packages cream cheese, softened
- 1 cup sugar
- 1 teaspoon vanilla extract
- 2 large eggs
Ingredient Notes (Substitutions, Healthy Swaps)
- Graham cracker crumbs: Use crushed digestive biscuits or vanilla wafer crumbs as a simple swap. For a nutty twist, pulse almonds or pecans into the crumbs (reduce butter slightly if nuts are oily).
- Sugar: Light brown sugar works for a slightly deeper flavor. For lower sugar, use 3/4 cup granulated sugar plus 1/4 cup sugar substitute designed for baking, but texture may vary.
- Butter: Use salted butter and omit any added table salt elsewhere, or use clarified butter for a cleaner crust taste.
- Cream cheese: Full-fat cream cheese gives the best texture and flavor. Low-fat or Neufchâtel can be used but expect a softer texture and slightly tangier taste.
- Eggs: Two large eggs are needed for structure. For egg-free diets, a commercial egg replacer might work, but the texture will be different and may be softer or less set.
- Vanilla: Pure vanilla extract gives the best aroma. Imitation vanilla works in a pinch.
Step-by-Step Instructions
Step 1 – Prepare and preheat
Preheat your oven to 325°F (160°C). Line a standard 12-cup muffin tin with cupcake liners or lightly grease the cups.
Visual cue: When the oven reaches temperature, have both the crust and filling ready so you can assemble quickly.
Step 2 – Make the crust
In a bowl, combine 1 1/2 cups graham cracker crumbs, 1/3 cup sugar, and 1/2 cup melted butter. Mix until the crumbs are evenly moistened.
Press about 1 to 2 tablespoons of the crumb mixture into the bottom of each cupcake liner to form an even crust layer.
Step 3 – Beat the cream cheese
In a separate mixing bowl, beat the 2 packages (16 ounces total) of softened cream cheese until smooth and free of lumps. Gradually add 1 cup sugar and 1 teaspoon vanilla extract, mixing until combined and creamy.
Step 4 – Add the eggs
Add the 2 large eggs one at a time, mixing well after each addition. Scrape the bowl sides so the filling is smooth and uniform.
Step 5 – Assemble
Pour or spoon the cream cheese mixture over the prepared crusts in the muffin tin, filling each about three-quarters full. Tap the tin gently on the counter to release air bubbles.
Step 6 – Bake
Bake in the preheated oven for 20–25 minutes or until the centers are set. The edges should appear firm and the center slightly jiggly but not liquid.
Pro cue: A gentle jiggle in the center is normal—the cheesecakes will firm up as they cool.
Step 7 – Cool and chill
Let the mini cheesecakes cool to room temperature, then refrigerate for at least 2 hours before serving so they set fully and slice cleanly.
Pro Tips for Success
- Use room-temperature cream cheese and eggs: this prevents lumps and gives a super-smooth filling.
- Don’t overmix once eggs are added: overbeating adds air and can cause cracks or a spongey texture.
- Press crust firmly into the pan so it holds together when serving.
- Bake until centers are just set — slightly jiggly centers will firm up in the fridge.
- Cool on a wire rack briefly before refrigerating to avoid condensation pooling on liners.
- Chill at least 2 hours, but for best texture chill 4 hours or overnight.
- Run a thin knife around each cheesecake before removing from the liner if they stick.
Flavor Variations
- Optional — Fresh berry topping: Spoon fresh strawberries, raspberries, or blueberries on top after chilling.
- Optional — Lemon zest: Add 1 teaspoon lemon zest to the filling for a bright citrus note.
- Optional — Chocolate swirl: Fold 2 tablespoons softened chocolate ganache into the filling or swirl on top before baking.
- Optional — Salted caramel: Drizzle salted caramel over each cheesecake just before serving.
- Optional — Nut crunch: Sprinkle chopped toasted nuts on the crust before pressing the crumbs.
- Optional — Mini jam dollop: Add a small spoonful of raspberry or apricot jam to the center after baking and chilling.
Serving Suggestions
- Serve chilled on a small dessert plate with a fresh berry on top.
- Plate three mini cheesecakes on a dessert board with assorted fruit and cookies for a party.
- Offer a small spoon of warm berry compote beside each for guests to add.
- Add whipped cream and a lemon twist for a simple café-style presentation.
- Pair with coffee or tea for brunch or an after-dinner treat.
- Package a few in a small box with tissue for gifts or potlucks.
Make-Ahead, Storage & Reheating
- Make-ahead: You can make the entire cheesecakes up to 24 hours ahead and keep them refrigerated. The flavor often improves after a day.
- Storage duration (fridge): Store in an airtight container for up to 4 days. Keep liners or a loose cover to prevent fridge odors from affecting the flavor.
- Reheating best practices: These are best served cold. If you prefer them slightly less chilled, let them sit at room temperature for 10–15 minutes before serving. Avoid microwaving — it changes texture and can make them grainy.
- Texture changes: After refrigeration, the filling becomes firmer and creamier. Prolonged storage (beyond 4 days) may cause the crust to soften slightly.
Storage and Freezing Instructions
- Freezing is possible but not ideal: The texture of the cream cheese filling can change slightly after freezing and thawing, becoming a bit grainy.
- To freeze: Place cooled mini cheesecakes on a baking sheet and freeze until solid, then wrap each individually in plastic wrap and place in a freezer-safe container for up to 2 months.
- To thaw: Move to the refrigerator overnight. Serve cold. If texture is slightly grainy, let them come to room temperature for 10–15 minutes before serving to soften.
- If you prefer not to freeze finished cheesecakes, freeze the crust and filling separately as a filling mix is more forgiving. Alternatively, prepare crusts and keep the filling chilled in a sealed container for 24 hours before assembling and baking.
Nutrition Facts (Per Serving)
Calories | Protein | Carbs | Fat | Fiber | Sodium
— | —: | —: | —: | —: | —:
340 kcal | 5 g | 33 g | 23 g | 0.5 g | 200 mg
Estimates vary by brands and portions.
FAQ About Mini Cheesecakes
Q: Why is my cheesecake filling lumpy?
A: Lumps usually come from cold cream cheese. Always beat the cream cheese until very smooth before adding sugar or eggs.
Q: How do I know when mini cheesecakes are done?
A: The edges should look set and the centers slightly jiggly. A small jiggle is normal; they will firm as they cool.
Q: Can I use low-fat cream cheese?
A: Yes, but expect a softer, slightly tangier texture. It may not be as rich.
Q: Why did my crust fall apart when I served it?
A: The crust may be too thin or not packed firmly. Press the crumbs tightly and use enough butter to bind them.
Q: Can I bake these without cupcake liners?
A: Yes, grease the muffin tin well. Let cool slightly before removing to avoid sticking.
Q: How many mini cheesecakes does this recipe make?
A: This recipe is written for a standard 12-cup muffin tin; yield will be about 12 mini cheesecakes.
Notes
- For cleaner slices, chill thoroughly and use a warm, dry knife wiped between cuts.
- Use a cookie scoop to portion filling evenly for uniform mini cheesecakes.
- If using paper liners, choose sturdier cup liners to hold shape during cooling and serving.
- Top with a single berry and a tiny mint leaf for a simple, pretty garnish.
- If you want a gluten-free version, use gluten-free graham crumbs or almond flour for the crust.
Troubleshooting
- Bland flavor: Add a touch more vanilla or a teaspoon of lemon zest to brighten the filling.
- Overcooked/crumbly texture: Reduce bake time slightly and remove when centers are just set; avoid overbaking.
- Watery filling or weeping: Ensure cream cheese is fully at room temperature and avoid overmixing after adding eggs.
- Sinking centers: Tap out air bubbles before baking and avoid overbeating—too much air causes collapse.
- Crust too hard or greasy: Reduce butter slightly if using oily nut crumbs or increase crumbs for a firmer texture.
- Sticking to liners: Use a thin layer of cooking spray on liners or grease the muffin tin and leave a small cooling time before removing.
Final Thoughts
These mini cheesecakes deliver classic flavor with minimal fuss and make entertaining easy. They take simple ingredients and turn them into a rich, creamy treat that’s easy to portion and customize. Chill well, add your favorite topping, and enjoy a dependable dessert that works for many occasions.
Conclusion
For another reliable mini-dessert idea and inspiration for small-batch baked treats, see Mini Cheesecakes (in a Standard Muffin Pan) – Sally’s Baking.
Mini Cheesecakes
Ingredients
For the Base
- 1.5 cups graham cracker crumbs Can substitute with crushed digestive biscuits or vanilla wafer crumbs.
- 1/3 cup sugar Light brown sugar can be used for a deeper flavor.
- 1/2 cup butter, melted Use salted butter for best results.
For the Filling
- 16 ounces cream cheese, softened Full-fat cream cheese is recommended for texture.
- 1 cup sugar For lower sugar, use 3/4 cup granulated sugar plus 1/4 cup baking sugar substitute.
- 1 teaspoon vanilla extract Pure vanilla extract is best.
- 2 large eggs Ensure they are at room temperature.
Instructions
Preparation
- Preheat your oven to 325°F (160°C). Line a standard 12-cup muffin tin with cupcake liners or lightly grease the cups.
- In a bowl, combine graham cracker crumbs, sugar, and melted butter. Mix until the crumbs are evenly moistened.
- Press about 1 to 2 tablespoons of the crumb mixture into the bottom of each cupcake liner.
Making the Filling
- In a separate bowl, beat the softened cream cheese until smooth. Gradually add sugar and vanilla extract, mixing until creamy.
- Add eggs one at a time, mixing well after each addition and scraping the bowl sides.
Baking
- Pour the cream cheese mixture over the prepared crusts in the muffin tin, filling each about three-quarters full.
- Bake in the preheated oven for 20–25 minutes or until the centers are set and slightly jiggly.
Cooling
- Let the mini cheesecakes cool to room temperature, then refrigerate for at least 2 hours before serving.