

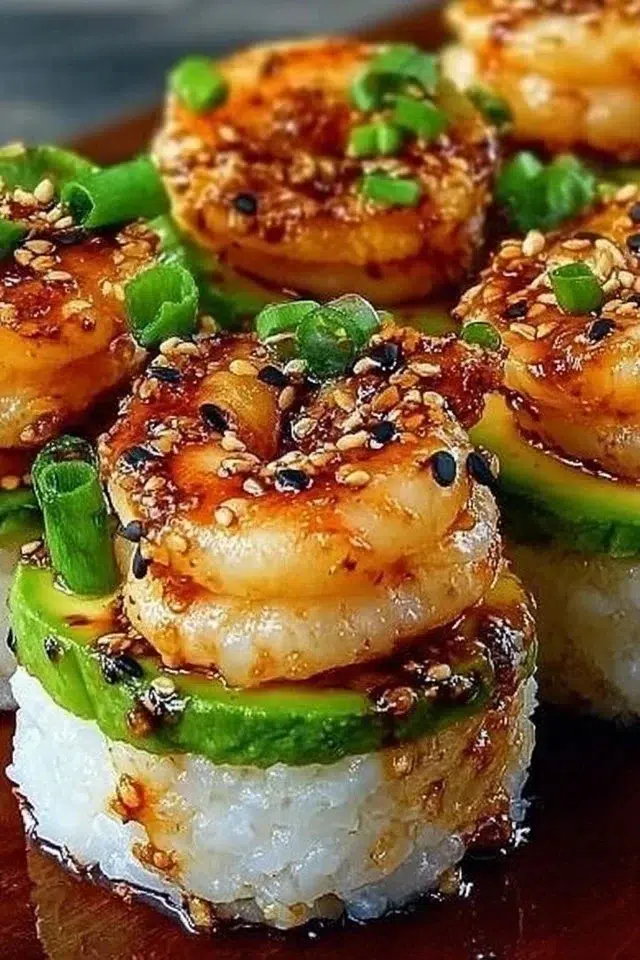
This spicy shrimp sushi stack is a layered, bite-ready twist on classic sushi that balances warm, seasoned rice with tender shrimp, creamy avocado, crisp nori, and a tangy spicy mayo. The textures pop — soft rice, silky avocado, firm shrimp and the thin crunch of nori — while the sauce ties everything together with heat and umami. It’s easy to make at home with simple steps: cook the rice, pan-sear the shrimp, mix a quick spicy sauce and stack. Serve as an elegant weeknight dinner, a party appetizer, or a bright brunch plate with pickled ginger on the side. If you love bold shrimp flavors, try a quick and spicy shrimp soup as a matching starter to keep the seafood theme.
Why You’ll Love This Spicy Shrimp Sushi Stacks
- Bold, balanced flavors: tangy rice vinegar, sesame oil, soy, and sriracha combine for full taste.
- Fun texture play: soft sushi rice, creamy avocado, firm shrimp and crisp nori.
- Fast to make: most active work is cooking shrimp and assembling stacks.
- Hands-off rice cooking: use a rice cooker or simmer and let it rest.
- Flexible presentation: use molds, bowls, or free-form stacks for casual or fancy plating.
- Great for entertaining: makes attractive single-serve stacks that look professional.
- Minimal equipment: nonstick pan and simple molds or ramekins are enough.
What Is Spicy Shrimp Sushi Stacks?
Spicy Shrimp Sushi Stacks are layered servings of sushi rice, nori, cooked shrimp, sliced avocado, and a spicy mayo-based sauce. They keep the core sushi flavors but remove the rolling step, making them faster and easier for home cooks. The taste is savory and slightly sweet from the seasoned rice, spicy from sriracha mayo, and rich from avocado and sesame oil. Cooking here is simple: you steam or simmer sushi rice, pan-cook shrimp quickly, and assemble in molds. The vibe fits a relaxed weeknight or a small gathering where you want something special without fuss.
Ingredients for Spicy Shrimp Sushi Stacks
For the Base
- 2 cups sushi rice
- 2 1/2 cups water
- 2 tablespoons rice vinegar
- Salt, to taste
- 1 tablespoon sesame oil
For the Shrimp
- 1 lb shrimp, peeled and deveined
- Salt and pepper, to taste
For the Sauce
- 1/4 cup mayonnaise
- 1–2 tablespoons sriracha sauce (adjust to taste)
- 1 tablespoon soy sauce
To Assemble / To Serve
- 1 avocado, sliced
- Seaweed sheets (nori), for layering
- Green onions, chopped (for garnish)
Ingredient Notes (Substitutions, Healthy Swaps)
- Rice: Use sushi or short-grain rice for the best texture. Medium-grain works in a pinch. For a lower-carb option, use cauliflower rice (note: texture will be different).
- Shrimp: Fresh or thawed frozen shrimp both work. Use medium to large size for easy stacking. For shellfish allergy, substitute thinly sliced seared tofu or cooked crab if desired.
- Mayonnaise: Use light mayo or Greek yogurt (thinner and tangier) to reduce calories; you may want to add a splash of oil for richness if using yogurt.
- Sriracha: Swap for any hot chili paste or sambal oelek. Reduce the amount for milder heat.
- Soy sauce: Use low-sodium soy sauce to cut salt. Tamari works for gluten-free needs.
- Avocado: If avocado browns quickly, toss slices in a little lemon juice or add them just before serving.
Step-by-Step Instructions
Step 1 – Rinse and cook the sushi rice
- Rinse 2 cups sushi rice under cold water until the water runs clear to remove excess starch.
- Combine rinsed rice with 2 1/2 cups water in a rice cooker or a pot. Cook according to your rice cooker instructions or bring to a boil, then cover and simmer for 18–20 minutes until the water is absorbed.
- Remove from heat and let rest, covered, for 10 minutes. Stir in 2 tablespoons rice vinegar, 1 tablespoon sesame oil, and salt to taste. Fluff gently with a rice paddle or fork.
Visual cue: Cooked sushi rice should be glossy and slightly sticky, not mushy.
Step 2 – Make the spicy sauce
- In a small bowl, whisk together 1/4 cup mayonnaise, 1–2 tablespoons sriracha (adjust to heat level), and 1 tablespoon soy sauce.
- Taste and adjust: add more sriracha for heat or a touch more mayo to tone it down.
- Cover and refrigerate until ready to use.
Step 3 – Cook the shrimp
- Pat 1 lb shrimp dry and season lightly with salt and pepper.
- Heat a nonstick pan over medium heat and add a small drizzle of oil if needed. Cook shrimp 2–3 minutes per side until pink and opaque.
- Remove shrimp from the pan and let cool slightly before assembly.
Pro cue: Do not overcook shrimp — remove as soon as they turn pink and firm. They will continue to cook a bit as they cool.
Step 4 – Prepare avocado and nori
- Slice 1 avocado just before assembly to prevent browning. Keep slices neat for clean layers.
- Cut nori sheets to fit your molds or bowls. You can use a whole sheet lightly trimmed for each layer.
Step 5 – Assemble the stacks
- Place a mold or small bowl on your plate. Start with a layer of sushi rice, press gently. Add a piece of cut nori, a layer of shrimp, avocado slices, and a drizzle of spicy sauce. Repeat layers ending with a top layer of rice.
- Carefully lift the mold. Garnish with chopped green onions and extra sauce around the plate.
Visual cue: Stack should hold shape when lifted from mold. If it falls, press layers a bit firmer next time.

Pro Tips for Success
- Cool rice slightly before assembling; hot rice can soften nori and make layers fall apart.
- Dry shrimp well before cooking to get a quick sear and prevent steaming.
- Slice avocado with a sharp knife and scoop out in neat pieces to keep presentation clean.
- If you don’t have molds, use a clean tin can with both ends removed or a small ramekin lined with plastic wrap.
- Taste the spicy sauce before adding to stacks; adjust soy or sriracha for your preferred balance.
- Keep nori dry until assembly to maintain its crispness.
- Make small test stacks to check seasoning and heat before plating a full batch.
Flavor Variations
- OPTIONAL: Citrus kick — add 1 teaspoon of lime juice to the spicy mayo for bright acidity.
- OPTIONAL: Wasabi mayo — mix a small dab of wasabi paste into the sauce for a sharp, classic sushi heat.
- OPTIONAL: Crunch layer — add thinly sliced cucumber or tempura crumbs between layers for extra crunch.
- OPTIONAL: Sesame crunch — sprinkle toasted sesame seeds between layers and on top for nuttiness.
- OPTIONAL: Veggie-forward — add thin strips of carrot or daikon for freshness and color.
- OPTIONAL: Smoky heat — swap half the sriracha for smoked chili paste for deeper flavor.
Serving Suggestions
- Serve 4 stacks as a light dinner with a side salad of mixed greens and a ginger dressing.
- Offer small stacks as appetizers at a party with soy sauce and pickled ginger on the side.
- Pair with miso soup or a crisp cucumber salad for a fuller meal.
- Plate with a drizzle of extra spicy sauce and a sprinkle of toasted sesame seeds for a restaurant feel.
- Great for brunch paired with cold sake or iced green tea (avoid alcohol if preferred).
- Serve on a long platter for a shared family-style presentation.
Make-Ahead, Storage & Reheating
- Make-ahead: Cook rice, mix spicy sauce, and cook shrimp up to a day ahead. Store rice and shrimp separately in airtight containers in the fridge.
- Keep sliced avocado and assembled stacks for only a short time; assemble just before serving to avoid soggy nori and browned avocado.
- Storage duration: Store cooked rice and shrimp in the refrigerator for up to 3 days.
- Reheating: Reheat shrimp briefly in a warm pan for 30–60 seconds per side. Warm rice gently in the microwave with a damp paper towel to retain moisture. Avoid reheating assembled stacks; assembly fresh gives best texture.
- Texture changes: Refrigerated rice may firm up; loosen with a few drops of water and gently fluff before assembling.
Storage and Freezing Instructions
- Freezing is not recommended for assembled stacks because avocado and nori will change texture and ruin the crisp layers.
- You may freeze cooked shrimp separately for up to 1 month; thaw in the fridge overnight and reheat gently.
- Cooked rice can be frozen for up to 1 month in a sealed bag; thaw and reheat, then refresh with a little rice vinegar and sesame oil before assembling.
- Best practice: Prepare components ahead, then assemble stacks just before serving for optimal texture.
Nutrition Facts (Per Serving)
Calories | Protein | Carbs | Fat | Fiber | Sodium
—|—:|—:|—:|—:|—:
640 | 34 g | 78 g | 19 g | 4 g | 900 mg
Estimates vary by brands and portions.
FAQ About Spicy Shrimp Sushi Stacks
Q: How many servings does this recipe make?
A: This recipe is built around 1 lb shrimp and 2 cups rice — it generally serves about 4 people as a main or 6–8 as appetizers, depending on portion size.
Q: My rice is too sticky or too mushy. What went wrong?
A: Overcooking or using too much water makes rice mushy. Rinse rice well and use the 2 1/2 cups water for 2 cups sushi rice. Let rice rest covered after cooking.
Q: How do I keep nori from getting soggy?
A: Keep nori dry until assembly and add nori between layers right before serving. Slightly cool rice and shrimp to reduce moisture transfer.
Q: Can I use pre-cooked shrimp?
A: Yes. Thaw and warm pre-cooked shrimp gently; avoid overcooking. Adjust seasoning since pre-cooked shrimp may already be salted.
Q: What if my spicy sauce is too thick or too thin?
A: Thin with a little water or lemon juice if too thick; add more mayo to thicken. Taste as you adjust seasoning.
Q: Is there a vegetarian version?
A: OPTIONAL: Replace shrimp with sesame-tofu cubes or marinated cooked mushrooms and follow the same assembly.
Notes
- For neat layers, press rice gently but firmly in the mold; too much force can compact rice and change texture.
- Use a sharp knife to slice avocado and warm it slightly with your hands before placing to avoid tearing.
- Garnish with thin green onion slivers for color and a fresh bite.
- If serving for guests, place small bowls of extra spicy sauce and soy sauce on the table for personal seasoning.
- Clean knife between cuts for perfect, clean slices of avocado and stacks.
Troubleshooting
- Bland flavor: Adjust rice vinegar, soy sauce, or add a pinch more salt to the rice. Taste each component before assembling.
- Overcooked shrimp: Shrimp become rubbery if left too long on heat. Cook 2–3 minutes per side until opaque and pink.
- Watery stacks: Cool rice and shrimp before stacking; press layers only slightly and assemble just before serving.
- Soggy nori: Add nori at the last moment and keep it dry; assemble stacks right before serving.
- Sauce separation: If mayo-based sauce separates, whisk energetically and add a teaspoon of lemon juice to re-emulsify.
- Rice too dry after refrigeration: Sprinkle a few drops of water and reheat covered to restore moisture.
Final Thoughts
This Spicy Shrimp Sushi Stacks recipe turns simple ingredients into a striking dish with bold flavors and pleasing textures. It’s approachable for home cooks and flexible enough to adapt for parties or quick dinners — assemble just before serving for the best look and mouthfeel.
Conclusion
For a plated recipe guide and inspiration that matches this idea, see the original version at Spicy Shrimp Sushi Stacks – Closet Cooking.