
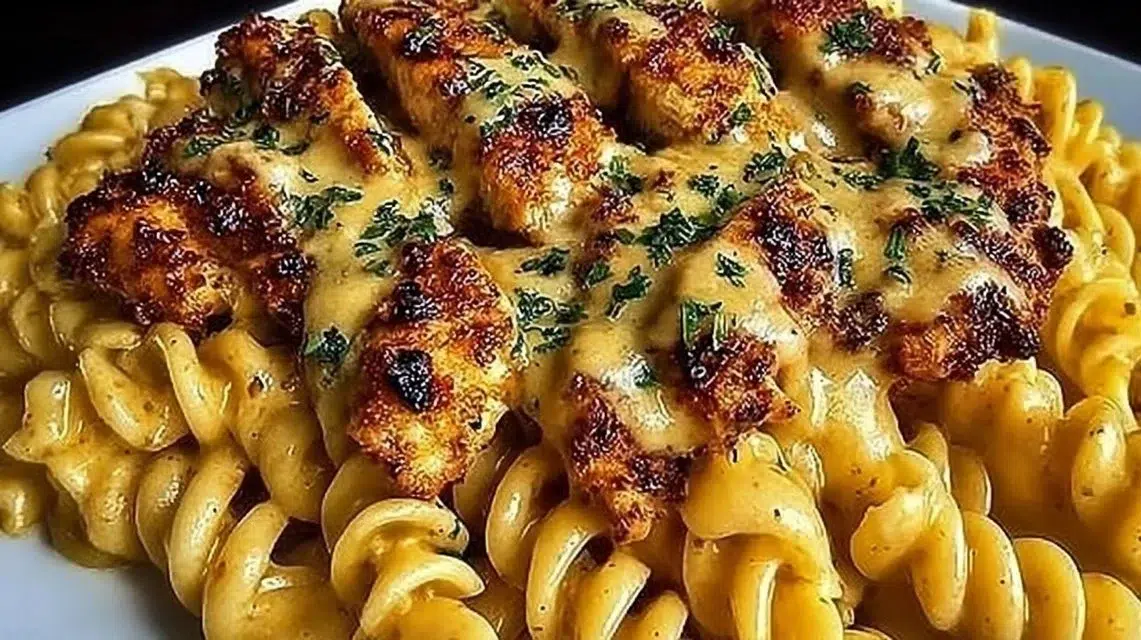
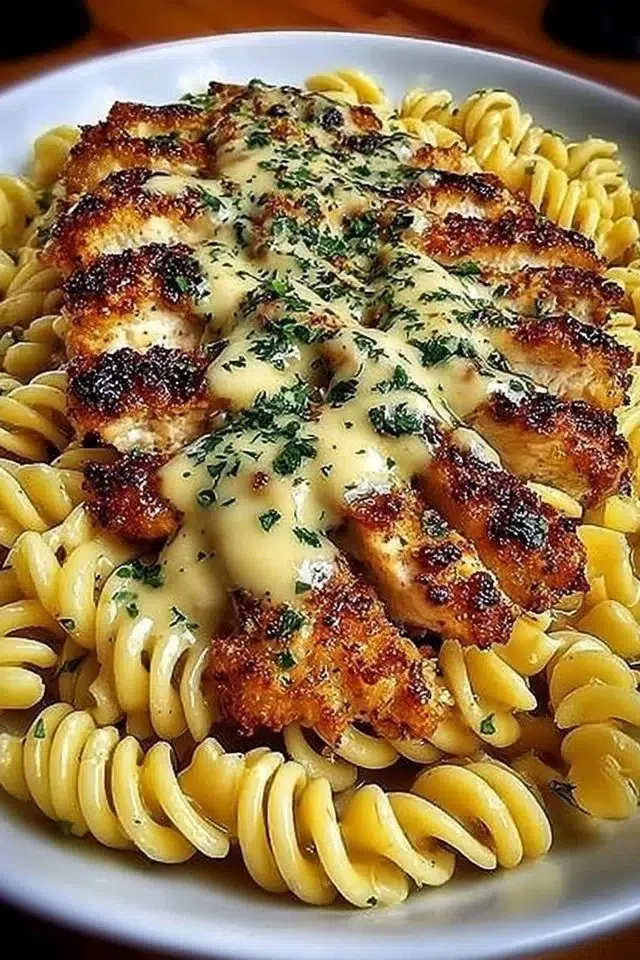
Cheesy Rotini with Garlic Parmesan Chicken is a warm, creamy weeknight meal that hits the comfort-food spot without fuss. The rotini holds the cheese and garlic sauce in its spirals so every forkful is coated and flavorful. Tender chicken adds protein and a mild savory bite, while grated Parmesan melts into a silky finish. This recipe is quick, uses pantry staples, and comes together in one skillet after the pasta is cooked. Serve with a simple green salad or crusty bread for a complete meal. For a crisped chicken twist, see crispy Parmesan chicken with a rich garlic sauce.
Why You’ll Love This Cheesy Rotini with Garlic Parmesan Chicken
- Simple, everyday ingredients you likely already have on hand.
- Rotini’s spiral shape traps cheese and garlic for big flavor in every bite.
- One-skillet finish keeps cleanup low after the pasta is cooked.
- Fast to make: pasta cooks while you brown the chicken.
- Easy to adjust: add reserved pasta water to reach the sauce consistency you like.
- Mild, family-friendly flavors that please kids and adults alike.
- Can be dressed up with fresh parsley for color and freshness.
- Flexible enough for weeknight dinners or casual weekend lunches.
What Is Cheesy Rotini with Garlic Parmesan Chicken?
Cheesy Rotini with Garlic Parmesan Chicken is a simple pasta and chicken dish where al dente rotini is tossed with sliced cooked chicken, sautéed garlic, and grated Parmesan. It tastes savory and buttery with a clear garlic note and a salty, nutty Parmesan finish. The texture is creamy but not heavy — the cheese melts into the pasta and lightly coats the chicken. The cooking method combines boiling and quick skillet work: pasta is cooked separately, and the chicken and garlic are cooked in a skillet, then everything is combined so flavors blend without overcooking. The vibe is classic comfort food and works well for weeknight dinners, casual gatherings, or a cozy meal any time you want something satisfying and fast.
Ingredients for Cheesy Rotini with Garlic Parmesan Chicken
For the Base
- Rotini pasta
For the Protein
- Chicken breast
For the Flavor
- Garlic (minced)
- Parmesan cheese (grated)
- Olive oil
- Salt
- Pepper
To Serve
- Parsley (optional, for garnish)
Ingredient Notes (Substitutions, Healthy Swaps)
- Swap rotini for any short pasta like penne or fusilli if that’s what you have. The recipe works the same.
- Use boneless, skinless chicken breast as written. For juicier meat, use chicken thighs but cut the cooking time and check doneness.
- Minced garlic from a jar works in a pinch, but fresh minced garlic gives the best flavor.
- Grated Parmesan is important for the right flavor and melting. Pecorino Romano can be used for a saltier bite (optional).
- Olive oil is neutral and heat-stable for this dish. Use a light-tasting oil if you prefer a milder finish.
- To make it lower fat, use less olive oil and reduce the amount of cheese, or use a light Parmesan-style cheese (optional).
- For a lower-sodium version, choose low-sodium or reduced-salt Parmesan and skip extra table salt until tasting.
Step-by-Step Instructions
Step 1 – Cook the pasta
- Cook the rotini according to package instructions in a large pot of salted boiling water until al dente.
- Drain and set aside.
Visual cue: The rotini should be firm to the bite but not hard; it will finish cooking briefly when you toss it with the hot chicken and cheese.
Step 2 – Heat the skillet
- In a large skillet, heat a splash of olive oil over medium heat.
Pro cue: Give the oil a few seconds to warm; it should shimmer but not smoke.
Step 3 – Cook the chicken
- Season the chicken breast with salt and pepper on both sides.
- Add the chicken to the hot skillet and cook until fully cooked, about 7–8 minutes per side.
- Remove chicken to a plate and let rest, then slice or chop as desired.
Pro cue: Use an instant-read thermometer — the safe internal temperature is 165°F (74°C). Resting keeps the meat juicy.
Step 4 – Sauté the garlic
- Add a little more olive oil to the skillet if needed, then add the minced garlic.
- Cook for about one minute, stirring constantly.
Visual cue: Garlic should become fragrant and slightly golden but not brown.
Step 5 – Combine pasta and chicken
- Add the drained pasta to the skillet with the garlic, then return the sliced or chopped chicken to the pan.
- Toss gently to combine so the garlic coats the pasta and chicken.
Step 6 – Add the cheese and finish
- Stir in the grated Parmesan cheese until it melts and coats the pasta and chicken.
- If the mixture seems too dry, add a splash of reserved pasta cooking water to loosen the sauce.
Pro cue: Add water a little at a time until the sauce reaches a smooth, glossy consistency.
Step 7 – Adjust and serve
- Taste and adjust salt and pepper if needed.
- Garnish with chopped parsley if desired and serve warm.
Visual cue: The finished dish should look glossy with a light cheese coating and small flecks of garlic and parsley.
Pro Tips for Success
- Salt the pasta water well. It’s the main chance to season the pasta itself.
- Don’t overcook the pasta; stop at al dente because it will soften slightly when tossed with hot chicken and cheese.
- Use a hot skillet to sear the chicken quickly for a nice crust; this adds flavor.
- Let the chicken rest before slicing so juices lock in and meat stays tender.
- Grate the Parmesan fresh for better melt and flavor; pre-grated can be coated with anti-caking agents that affect melting.
- Reserve some pasta cooking water before draining — that starchy water helps create a smooth sauce.
- If garlic browns, it turns bitter; remove from heat quickly if it starts to color.
- Taste before adding extra salt; Parmesan adds saltiness on its own.
Flavor Variations
- OPTIONAL: Add a squeeze of lemon and a pinch of crushed red pepper for a bright, slightly spicy lift.
- OPTIONAL: Stir in a handful of baby spinach or peas at the end until wilted for extra color and nutrition.
- OPTIONAL: Swap Parmesan for a 50/50 mix of Parmesan and shredded mozzarella for a stretchier, creamier finish.
- OPTIONAL: Add a teaspoon of Dijon mustard when you add the cheese for a tangy depth.
- OPTIONAL: Toss in toasted pine nuts or chopped toasted walnuts for a nutty crunch at serving.
Serving Suggestions
- Pair with a simple green salad dressed with lemon and olive oil to cut the richness.
- Serve with roasted or steamed vegetables like broccoli or green beans.
- Offer crusty bread or garlic bread to soak up any remaining sauce.
- Plate with a light sprinkle of extra grated Parmesan and a fresh parsley garnish.
- Great for weeknight family dinners, casual weekend lunches, or easy dinner guests.
- Serve with a side of roasted tomatoes for a sweet contrast.
Make-Ahead, Storage & Reheating
- Make-ahead: Cook the pasta and chicken separately, cool, and store in airtight containers; assemble and heat when ready to serve.
- Storage duration: Keep leftovers in the refrigerator for up to 3–4 days.
- Reheating best practices: Reheat gently in a skillet over low-medium heat with a splash of water or broth to revive the sauce, stirring frequently. Microwave reheating works too; add a little water and cover to retain moisture.
- Texture changes: The pasta will absorb sauce and may become firmer or drier after cooling. Adding a splash of water when reheating restores creaminess.
Storage and Freezing Instructions
- Refrigerate leftovers in an airtight container for up to 3–4 days.
- Freezing is not ideal because the texture of cooked pasta and cheese can change and become grainy when thawed. If you must freeze, place in a freezer-safe container for up to 1 month and expect some texture loss.
- If frozen, thaw overnight in the refrigerator and reheat gently on the stove with a splash of water to help the sauce re-emulsify.
- For best quality, store components separately: freeze cooked chicken alone and fresh-cooked pasta in a light oil coating separately if you plan long-term storage.
Nutrition Facts (Per Serving)
Calories | Protein | Carbs | Fat | Fiber | Sodium
— | —:| —:| —:| —:| —:
Approx. 650 kcal | 38 g | 70 g | 22 g | 3 g | 750 mg
Estimates vary by brands and portions.
FAQ About Cheesy Rotini with Garlic Parmesan Chicken
Q: My sauce is too thick — how can I fix it?
A: Add a little reserved pasta cooking water or plain hot water, a tablespoon at a time, until you reach the desired consistency.
Q: How do I know when the chicken is done?
A: Use an instant-read thermometer: the internal temperature should be 165°F (74°C). Slicing to check the juices run clear also works.
Q: The garlic burned — can I save the dish?
A: Remove the burned garlic and sauté a fresh small amount of garlic in clean oil, then toss with the pasta. If the burned taste is strong, consider starting the garlic step over.
Q: Can I use pre-grated Parmesan?
A: Yes, but fresh-grated Parmesan melts better and has a brighter flavor.
Q: Can I make this dairy-free?
A: This specific recipe centers on Parmesan. For dairy-free, substitute a dairy-free grated alternative and skip or replace the cheese with a nut-based sauce (optional).
Q: How many servings does this make?
A: Serving count depends on portion sizes. Typical family recipes using about 8 ounces pasta and one pound chicken serve 3–4 people.
Notes
- Freshly grated Parmesan gives better melt and flavor than pre-grated.
- Reserve pasta water before draining — it’s the easiest way to adjust sauce texture.
- Let cooked chicken rest 5 minutes before slicing to lock in juices.
- Garnish with chopped parsley for color and a mild fresh note.
- Work quickly when combining pasta and chicken so the cheese melts evenly and the pasta finishes cooking in the sauce.
Troubleshooting
- Bland flavor: Make sure to salt the pasta water and taste before serving; add a little extra Parmesan or salt if needed.
- Overcooked chicken: Reduce heat and check early with a thermometer; slice thin to make it seem more tender.
- Watery sauce: Add more grated Parmesan and simmer briefly to thicken, or toss over medium heat until excess water reduces.
- Burned garlic: Stop immediately, remove the garlic bits, and sauté fresh garlic in clean oil.
- Cheese clumps: Stir vigorously and add a little hot pasta water to smooth the cheese into a sauce.
- Dry pasta: Add reserved pasta water in small amounts while tossing until creamy.
Final Thoughts
This Cheesy Rotini with Garlic Parmesan Chicken is simple, quick, and full of familiar, comforting flavors. It’s easy to make your own with small swaps and stores well for weekday meals. Try it for a no-fuss dinner that still feels like a treat.
Conclusion
If you want another take on garlic Parmesan chicken served with pasta, check this version for inspiration: Garlic Parmesan Chicken Pasta – The Salted Pepper.