
Savor a crispy, cheesy snack that comes together fast and uses sourdough discard for extra tang and texture. These Crispy Sourdough Cheesy Breadsticks are golden on the outside, tender inside, and studded with melted cheese that browns and crisps as it bakes. The dough is simple to mix and only needs a minute of kneading before rolling out. They are perfect for a weeknight snack, game day, or a simple side for soup and salad. For a quick pairing, serve warm with marinara or a light garlic yogurt dip and try a similar hearty twist with cheesy burger bowls with crispy potatoes and fresh toppings for a full meal vibe.
Why You’ll Love This Crispy Sourdough Cheesy Breadsticks
- Uses sourdough discard so you waste less and get a mild tang without long fermentation.
- Fast to make: one bowl mix, a quick knead, and 15–20 minutes in the oven.
- Crispy edges and a soft, cheesy center — great texture contrast in every bite.
- Flexible cheese choice: use mozzarella for stretch or cheddar for sharp flavor.
- Minimal ingredients you likely already have in the kitchen.
- Works as snack, appetizer, or side for soup and salads.
- Kid-friendly and easy to customize with optional spices.
- Hands-on time is low; most steps are quick and straightforward.
What Is Crispy Sourdough Cheesy Breadsticks?
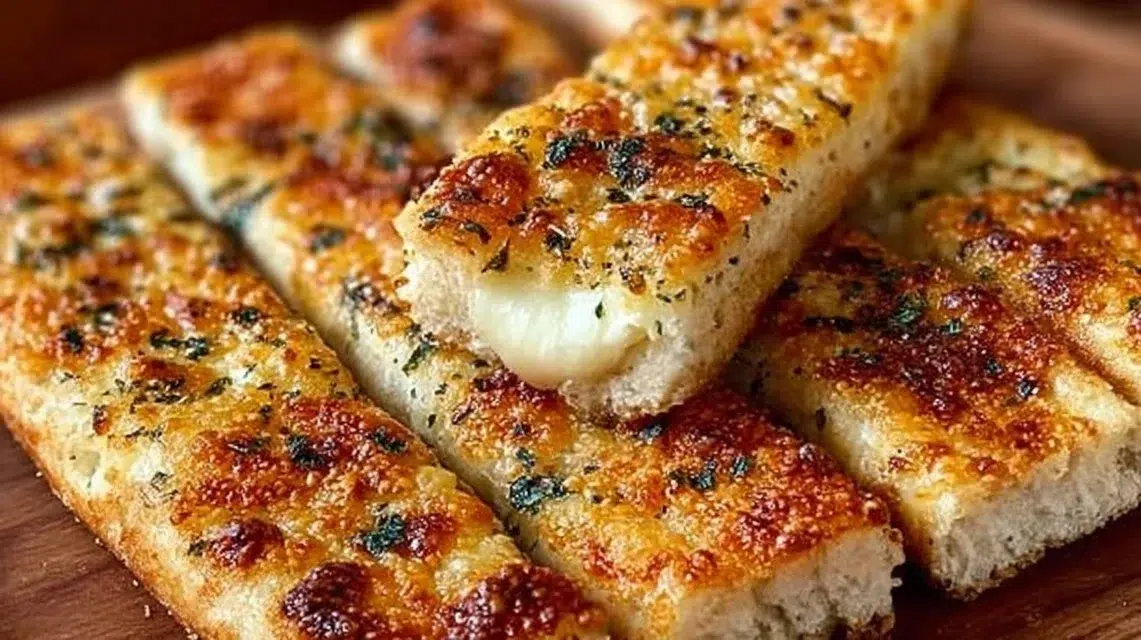
These are thin, cheese-topped breadsticks made from a simple dough that uses sourdough discard instead of fresh starter. They bake until the dough is golden and the cheese crisps on top, creating a salty, savory snack with a slight tang from the discard. The cooking method is straightforward: mix the dough, roll it thin, scatter shredded cheese, cut into strips, and bake on a parchment-lined sheet. The vibe is casual comfort food — great for weeknight snacks, brunch spreads, party finger food, or alongside a bowl of soup.
Ingredients for Crispy Sourdough Cheesy Breadsticks
For the Base
- 1 cup sourdough discard
- 1 cup all-purpose flour
- Water, as needed
For Flavor
- 1 teaspoon garlic powder
- 1 teaspoon salt
- 1/2 teaspoon paprika (optional)
For the Topping
- 1 cup shredded cheese (e.g., mozzarella or cheddar)
Ingredient Notes (Substitutions, Healthy Swaps)
- Sourdough discard: Any mature discard works. If it’s unusually thick, stir in a tablespoon of water to loosen before mixing.
- Flour: Use all-purpose flour as listed. For a slightly denser result, swap up to half the flour for whole wheat (optional).
- Cheese: Mozzarella gives melty stretch; cheddar gives stronger flavor. A mix of both is optional and works well.
- Garlic powder and paprika: Keep these for flavor — you can use 1/2 teaspoon onion powder instead of garlic powder (optional).
- Salt: Reduce to 1/2 teaspoon for a low-sodium option, especially if your cheese is very salty.
- Water: Add just enough to form a soft but not sticky dough. This keeps the breadsticks easy to shape.
Step-by-Step Instructions
Step 1 – Preheat and prepare
Preheat your oven to 400°F (200°C). Line a baking sheet with parchment paper so the cheese won’t stick and clean up is easier.
Visual cue: The oven should be fully heated so the cheese starts to crisp as soon as the breadsticks go in.
Step 2 – Mix the dry ingredients and discard
In a mixing bowl, add 1 cup sourdough discard, 1 cup all-purpose flour, 1 teaspoon garlic powder, 1 teaspoon salt, and 1/2 teaspoon paprika (optional). Stir to combine until a loose dough forms.
Visual cue: The dough will look shaggy and hold together but not be too wet.
Step 3 – Knead briefly
Turn the dough onto a lightly floured surface and knead for a minute or two until smooth and elastic. Add a little flour if the dough is sticky or a splash of water if it feels too dry.
Pro cue: Knead just enough to bring the dough together — over-kneading can make it tough.
Step 4 – Roll out and top
Roll the dough into a rectangle about 1/4 inch thick. Sprinkle the shredded cheese evenly over the surface, pressing lightly so the cheese sticks to the dough.
Visual cue: The cheese should cover the dough evenly and not be piled too high.
Step 5 – Cut and bake
Cut the dough into strips or your desired shapes. Place the strips on the prepared baking sheet with a little space between each. Bake for 15–20 minutes, or until the edges are golden brown and the cheese is crispy.
Pro cue: Check at 12–15 minutes — ovens vary. When the edges are golden and the cheese looks browned and crisp, they are done.

Pro Tips for Success
- Use a well-heated oven: 400°F gives a fast crisp without drying the interior.
- Roll to 1/4 inch thick: thinner will be crispier; thicker will stay softer inside.
- Press cheese gently into the dough so it adheres and melts into the surface.
- If pieces spread in the oven, place them a little farther apart and use a cooler lower rack.
- For even browning, rotate the pan halfway through baking.
- Don’t over-knead: a quick 1–2 minute knead keeps a light texture.
- If dough is sticky, dust your board and rolling pin with flour rather than adding large amounts into the dough.
- Use parchment to prevent cheese from sticking to the pan.
Flavor Variations
- Optional Herb & Parmesan: Mix 1–2 teaspoons dried Italian herbs into the dough and swap half the shredded cheese for grated Parmesan for a sharper finish.
- Optional Spicy Kick: Add 1/4 teaspoon cayenne or sprinkle red pepper flakes on top before baking.
- Optional Everything Seasoning: Top with sesame, poppy seeds, onion, and garlic flakes for a bold crust.
- Optional Cheesy Blend: Use a 50/50 mix of mozzarella and cheddar for a balance of melt and sharpness.
- Optional Garlic Butter Finish: Brush with a light drizzle of olive oil mixed with minced garlic after baking (optional — not required by the base recipe).
Serving Suggestions
- Serve warm with marinara or your favorite tomato dipping sauce.
- Pair with a green salad and soup for an easy light dinner.
- Offer as a party appetizer with a variety of dips: ranch, pesto, or garlic yogurt.
- Add to a brunch board with sliced tomatoes, olives, and cured (non-pork) meats or roasted vegetables.
- Use as a handheld side with pasta or chili to soak up sauces.
- Plate in a stack or fan them on a serving board for a casual appetizer display.
Make-Ahead, Storage & Reheating
- Make-ahead: You can mix and shape the dough, top with cheese, and keep it covered in the fridge for up to 8 hours before baking. For best texture, bake from chilled rather than frozen.
- Storage: Store cooled breadsticks in an airtight container in the refrigerator for up to 3 days.
- Reheating: Reheat in a 350°F (175°C) oven for 5–8 minutes until warmed and crisp. A toaster oven also works well for single portions. Avoid microwaving unless you accept a softer texture.
- Texture notes: Breadsticks will lose some crispness over time. Reheating in a hot oven restores much of the crunch.
Storage and Freezing Instructions
- To freeze: Bake fully, let cool, then freeze flat on a tray for 1 hour before transferring to a freezer bag. This prevents sticking. Freeze up to 2 months.
- To reheat from frozen: Reheat at 350°F (175°C) for 10–15 minutes, or until warmed through and crisp.
- If you prefer not to freeze: Par-bake (bake for 8–10 minutes until set but not fully browned), cool, then freeze. Finish baking from frozen at 400°F for 8–12 minutes until golden.
- Note: Freezing can slightly affect texture; freshly baked is best for peak crispness.
Nutrition Facts (Per Serving)
Calories | Protein | Carbs | Fat | Fiber | Sodium
—|—:|—:|—:|—:|—:
139 | 5.5 g | 17 g | 5 g | 0.6 g | 375 mg
Estimates vary by brands and portions.
FAQ About Crispy Sourdough Cheesy Breadsticks
Q: My dough is too dry. What should I do?
A: Add water a teaspoon at a time while mixing until the dough comes together. The dough should be soft but not sticky.
Q: My dough is too wet and sticky. How do I fix it?
A: Dust the surface with a little flour and knead briefly. Add flour sparingly — a little goes a long way.
Q: How do I know when the breadsticks are done?
A: They are done when the edges are golden brown and the cheese on top is browned and slightly crisp.
Q: Can I use pre-shredded cheese?
A: Yes. Pre-shredded cheese works fine, though freshly shredded cheese may melt a bit more smoothly.
Q: Can I make them gluten-free?
A: This recipe uses all-purpose flour. For gluten-free, try a 1-to-1 gluten-free blend designed for baking and expect slightly different texture.
Q: How long will leftovers stay fresh?
A: Stored in an airtight container in the fridge, they stay good for up to 3 days. Reheat in the oven for best results.
Notes
- For a shiny top, brush very lightly with water before sprinkling cheese (optional and minimal).
- Use a sharp pizza wheel or knife to cut clean strips before baking; this keeps edges neat.
- If you want extra crisp, roll the dough slightly thinner than 1/4 inch.
- For easier cleanup, line the baking sheet with parchment and place a second sheet underneath to prevent spills.
- Let breadsticks cool a few minutes on the sheet before moving to a rack to keep a crisp bottom.
Troubleshooting
- Bland flavor: Increase garlic powder to 1 1/2 teaspoons or use a sharper cheese next time.
- Too soft after baking: Bake a few minutes longer or move to a lower oven rack for a crisper bottom.
- Cheese burns before dough cooks: Lower the oven rack or tent with foil for the last few minutes so the dough finishes baking.
- Dough spreads and becomes thin: Chill briefly in the fridge for 10 minutes before cutting and baking to hold the shape.
- Sticks to pan: Ensure generous use of parchment paper; cheese can melt and stick without it.
- Overly salty: Use low-sodium cheese or reduce the added salt to 1/2 teaspoon.
Final Thoughts
These Crispy Sourdough Cheesy Breadsticks are simple, flexible, and a great way to use sourdough discard while making a crunchy, melty snack everyone will enjoy. They come together quickly and adapt to many flavors, so you can keep them basic or dress them up to match the meal.
Conclusion
For a tested take on a cheesy sourdough snack and more ideas, see Cheesy Sourdough Breadsticks – Amy Bakes Bread.