

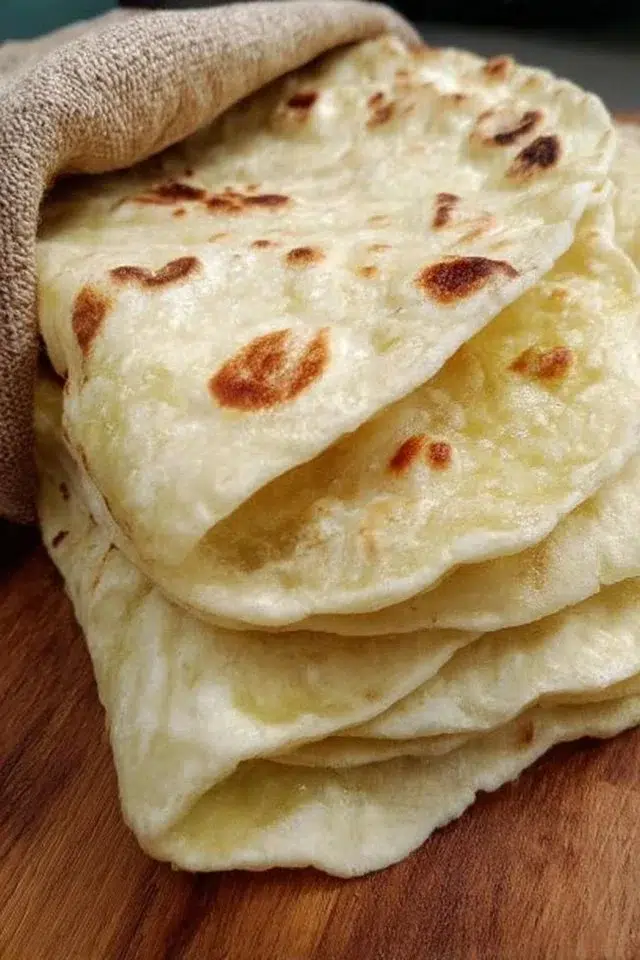
Sourdough discard tortillas are soft, chewy, and slightly tangy with a hint of olive oil richness. They fold easily for tacos, hold up under fillings, and toast to gentle brown spots when cooked low and slow. This easy dough comes together with just a few pantry staples and a short rest, so you can have fresh tortillas in under an hour. They are great for quick weeknight tacos, breakfast wraps, or to serve with beans and roasted veggies. If you like baking with discard, you might also enjoy this brown butter sourdough discard chocolate chip cookies as another way to use extra starter.
Why You’ll Love This Sourdough Discard Tortillas
- Uses sourdough starter discard so you reduce waste and add gentle tang.
- Only five simple ingredients and minimal hands-on work.
- Soft, flexible texture that holds fillings without cracking.
- Quick: dough rests 30 minutes, then eight tortillas cook in a single pan session.
- No special tools required — mix by hand or use a stand mixer with a dough hook.
- Easy to store: keep in the fridge for a week or freeze for longer.
- Great blank canvas — pairs well with savory or sweet fillings.
- Works for tacos, burritos, quesadillas, or as flatbread for dipping.
What Is Sourdough Discard Tortillas?
Sourdough discard tortillas are thin flatbreads made by mixing sourdough starter discard with flour, water, olive oil, and a pinch of salt. The discard adds a light, tangy note and a soft crumb, while olive oil gives elasticity and a tender bite. These tortillas are cooked on a hot skillet until bubbles form and light brown spots appear; the low, steady heat keeps them soft rather than crisp.
They feel like comfort food and fit many meal vibes — fast weeknight dinners, casual brunch, or picnic packing. Because they use discard, they are a small, smart way to keep sourdough starter in use without needing to feed it first. The result is a tasty, flexible tortilla that works in many recipes.
Ingredients for Sourdough Discard Tortillas
For the Dough
- 1/2 cup sourdough starter discard (about 120 g or so)
- 1/4 cup olive oil (60 ml)
- 1/3 cup water (80 ml)
- 1 2/3 cup flour (about 200 g)
- 1/2 tsp sea salt
Ingredient Notes (Substitutions, Healthy Swaps)
- Sourdough starter discard: Use your regular discard at room temperature. If it’s very runny, stir it so it’s uniform before measuring.
- Olive oil: You can swap for another neutral oil (canola, vegetable) if you prefer. Butter will change texture and flavor.
- Water: If your discard is very thick, add water a tablespoon at a time to reach a smooth dough.
- Flour: All-purpose flour works best for the soft, flexible texture. You can try half whole wheat for a nuttier flavor, but expect denser tortillas. If using whole wheat, add an extra tablespoon or two of water as whole wheat absorbs more liquid.
- Salt: Adjust to taste. For lower sodium, reduce to 1/4 tsp but know the flavor will be milder.
Step-by-Step Instructions
Step 1 – Prepare the Dough
- In a large mixing bowl, whisk together the 1/2 cup sourdough discard, 1/4 cup olive oil, and 1/3 cup water until smooth.
- Add 1 2/3 cup flour and 1/2 tsp sea salt.
- Mix until a smooth dough forms. If you have a stand mixer, use the dough hook to knead briefly; otherwise knead by hand until the dough is smooth and slightly tacky.
Visual cue: The dough should come together in a soft ball and not be sticky on your fingers. If too sticky, add a tablespoon of flour at a time.
Step 2 – Stretch and Fold
- Do one set of stretch and folds: pull one side of the dough up and fold it over the center, rotate the bowl, and repeat from each side to complete four stretches.
- Cover the dough with a clean tea towel.
Visual cue: The dough will tighten slightly after folding and feel springy.
Step 3 – Rest
- Let the dough rest for 30 minutes at room temperature, covered with a tea towel.
Pro cue: Resting relaxes the gluten and makes rolling or pressing much easier.
Step 4 – Shape the Dough
- Divide the dough into eight even pieces.
- On a lightly floured surface or silicone mat, roll each piece into a thin round. Aim for as thin as possible without tearing.
- To prevent sticking, use parchment paper between rolled tortillas or roll between two sheets of parchment. You can also use a tortilla press if you have one.
Visual cue: Hold a rolled tortilla up to the light — you should just see a faint shadow through the dough where it is very thin.
Step 5 – Cook the Tortillas
- Heat a skillet over medium-low heat (cast iron is ideal).
- Once hot, cook each tortilla 3–4 minutes per side. Cook until bubbles form on the surface and light brown spots appear.
- Keep heat moderate — too high heat will brown the outside while leaving the center dry and tough.
Pro cue: If you see fast dark spots or burning, lower the heat. They should finish cooking slowly and stay soft.
Pro Tips for Success
- Use room temperature discard so it mixes smoothly into the dough.
- Don’t skip the 30-minute rest — it makes rolling much easier.
- Roll or press thin for soft, pliable tortillas; thicker rounds will be more bread-like.
- Keep the skillet at medium-low; cast iron retains heat and gives the best surface char without overcooking.
- Stack cooked tortillas between a clean towel to keep them warm and soft.
- If you see steam or bubbling too fast, reduce the heat by a notch.
- Place parchment between tortillas when storing to prevent sticking.
- If you use a stand mixer, knead only until the dough is smooth — over-kneading can make tortillas tight.
Flavor Variations
- OPTIONAL: Garlic-herb — add 1/2 tsp garlic powder and 1 tsp dried oregano to the dough.
- OPTIONAL: Chili-lime — mix 1/2 tsp chili powder and the zest of one lime into the dough for a bright kick.
- OPTIONAL: Seeded — press sesame or sunflower seeds onto each rolled tortilla before cooking for texture.
- OPTIONAL: Whole wheat twist — replace half the all-purpose flour with whole wheat flour and add 1–2 Tbsp water if needed for hydration.
- OPTIONAL: Cheesy tortillas — sprinkle a thin layer of grated cheese on the tortilla in the skillet and fold to melt for a quick quesadilla-style finish.
Serving Suggestions
- Fold and fill with roasted vegetables, beans, and a drizzle of yogurt for a simple vegetarian meal.
- Use as a base for breakfast wraps with scrambled eggs and salsa.
- Make quick tacos with grilled chicken or fish, fresh slaw, and lime.
- Cut into wedges and pan-fry to make crispy tortilla chips for dips.
- Serve warm alongside soups and stews as soft flatbread.
- Pack for lunches with layered fillings — keep sauce in a separate container.
Make-Ahead, Storage & Reheating
- Make-ahead: The dough can be mixed and stored in the fridge for up to 24 hours before dividing and rolling. Bring it to room temperature before rolling.
- Cooked tortillas: Store in an airtight container or wrapped in foil in the fridge for up to 1 week.
- Reheating: Reheat on a hot skillet for 10–20 seconds per side, or microwave wrapped in a damp paper towel for 15–20 seconds to steam them soft.
Texture changes: Refrigerated tortillas may firm up a little; quick reheating restores softness. Avoid long microwave times, which can dry them out.
Storage and Freezing Instructions
- To freeze: Cool cooked tortillas completely, then stack with parchment between each tortilla and wrap tightly in plastic wrap and foil or a freezer bag. Freeze up to 6 months.
- To use from frozen: Thaw in the fridge or at room temperature, then reheat on a hot skillet for 20–30 seconds per side until warmed through.
- If you do not want to freeze cooked tortillas, freeze the dough pieces: shape into balls, flash freeze on a tray, then bag. Roll out from frozen and cook slightly longer.
- Freezing is recommended for longer storage; fresh refrigerated tortillas are best within one week.
Nutrition Facts (Per Serving)
Calories | Protein | Carbs | Fat | Fiber | Sodium
—|—:|—:|—:|—:|—:
190 | 5 g | 26 g | 11 g | 2 g | 150 mg
Estimates vary by brands and portions.
FAQ About Sourdough Discard Tortillas
Q: My dough is too sticky. What should I do?
A: Sprinkle 1 tablespoon of flour at a time and knead until it is soft and not sticking. Resting helps too.
Q: Dough feels too dry and cracks when I roll it. How can I fix it?
A: Add water 1 teaspoon at a time and knead until it becomes elastic. Let it rest 10–15 minutes to absorb moisture.
Q: Tortillas are tearing when I roll them. Any tips?
A: Rest the dough longer and roll gently from the center outward. Use a tortilla press or roll between parchment to reduce sticking.
Q: They cook but stay doughy inside. Why?
A: Your heat is likely too low or the tortillas are too thick. Raise heat slightly while watching closely, or roll thinner.
Q: Can I use a tortilla press?
A: Yes. Lightly flour the press and press between parchment sheets to avoid sticking.
Q: How long do cooked tortillas last?
A: In the fridge up to 1 week; freeze up to 6 months.
Notes
- Use a silicone mat to roll on for an easy clean and less sticking.
- Place parchment between each rolled tortilla before stacking to make handling simple.
- Keep tortillas warm wrapped in a cloth while you cook the batch.
- For even cooking, flip as soon as bubbles appear and check for light browning.
- If you love sustainable kitchen swaps, try using a non-toxic tea towel and eco napkins; they help keep tortillas warm and absorb steam.
Troubleshooting
- Bland flavor: Add a touch more salt or serve with bright salsas to lift flavor.
- Tough tortillas: Overcooked or rolled too thick. Lower heat and roll thinner next time.
- Wet, sticky dough: Add flour a tablespoon at a time and knead; rest helps hydrate the flour.
- Burning on the skillet: Reduce heat and allow the pan to recover between tortillas.
- Tortillas that don’t puff: The dough can still be fine — thin tortillas may not puff much but will be flexible and tasty.
- Cracking when folding: Roll thinner and ensure proper rest to relax gluten.
Final Thoughts
These sourdough discard tortillas are a simple, useful way to save starter and make something fresh and tasty. They are forgiving, quick, and work in many meals, from tacos to wraps.
Conclusion
If you want another take on discard tortillas or more ideas, check out Sourdough Flour Tortillas (with discard or not) – Alexandra’s Kitchen for a slightly different approach and extra tips.